
You are using an out of date browser. It may not display this or other websites correctly.
You should upgrade or use an alternative browser.
You should upgrade or use an alternative browser.
Need help creating SHOLAY font
- Thread starter PhOeNiX
- Start date

Private Ryan
Skilled
If u know a bit of photoshop, then i can help you out..its pretty easy actually..
Btw, Do u want the font style only or the pattern as well?
Something like this??
Btw, Do u want the font style only or the pattern as well?
Something like this??
Private Ryan
Skilled
Thr are many ways to attain this effect, but i'll tell u an easy way... I assume u r using PS..
1. Take any image, go to filters > Textures > Stained glass. Select it. The stained glass option window will open. Now u can define the cell size and make sure u keep the border thickness = 1. Click okay. Be aware tht the border color is the foreground color u've selected. (in this case, black). Check the image below.
a) Original..

b) After applying stained glass filter..

2. now go to edit > Define pattern > a pop up will open, give the new pattern a name n click ok.
3. Now open a new blank image...and type in any text. I chose "impact in this case....Click on warp text and choose "bulge"..reduce the 'bend' and increase the vertical distortion a bit...So u'll have something like this...

4. In the layers panel, right click on the text layer and choose "blending options"... Now check Pattern Overlay option in the blending options. As u choose it, a default pattern is applied. Now in the right side, u'll see pattern's window. Remember the pattern we saved?? Its already added there... Go ahead and choose the pattern from the drop down list.

And BINGO!! your sholay effect is there.. Adjust the scaling according to ur taste.
Also u can add drop shadow in blending properties of the text layer to complete the effect...
So finally u'll get something like this...

Hope, tht helped...
Lol..i've got no work today...
1. Take any image, go to filters > Textures > Stained glass. Select it. The stained glass option window will open. Now u can define the cell size and make sure u keep the border thickness = 1. Click okay. Be aware tht the border color is the foreground color u've selected. (in this case, black). Check the image below.
a) Original..
b) After applying stained glass filter..
2. now go to edit > Define pattern > a pop up will open, give the new pattern a name n click ok.
3. Now open a new blank image...and type in any text. I chose "impact in this case....Click on warp text and choose "bulge"..reduce the 'bend' and increase the vertical distortion a bit...So u'll have something like this...
4. In the layers panel, right click on the text layer and choose "blending options"... Now check Pattern Overlay option in the blending options. As u choose it, a default pattern is applied. Now in the right side, u'll see pattern's window. Remember the pattern we saved?? Its already added there...
Go ahead and choose the pattern from the drop down list.And BINGO!! your sholay effect is there.. Adjust the scaling according to ur taste.
Also u can add drop shadow in blending properties of the text layer to complete the effect...
So finally u'll get something like this...
Hope, tht helped...
Lol..i've got no work today...
Private Ryan
Skilled
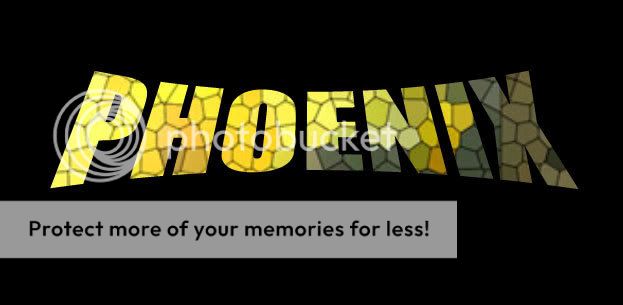
I'm sorry, i dont know whr to get tht font..but this is the closest i cud get with tinkering the fonts in PS..

Btw, wots so gr8 about this font?? U can try ur own variations too...
Btw, wots so gr8 about this font??
U can try ur own variations too...Private Ryan
Skilled
you also need to click the text layer, right click and go to "blending options" and you need a gradient overlay, with the gradiant being from "red - orange - yellow"
or just "red - yellow" and the one logo you came up with, good job, just remove the black stroke and increase opacity of the drop shadow a bit.
or just "red - yellow" and the one logo you came up with, good job, just remove the black stroke and increase opacity of the drop shadow a bit.
ok forget that: heres what to do.
open a file in ps, type "sholay" with the appropriate font (i used the one Private_Ryan provided, thanks dude) and click on the "create warped text" icon circled in red in the screenshot.

these are the settings i used for the "warped text"

after pressing "OK" you have your warped text. then press "Ctrl+T" to go into free transform mode. this is where you go wild, drag and increase the height of the text layer, i also squashed it a little bit.

after you're done with that. click "Layer > Layer Style > Gradient Overlay" and click on the gradient which has been circled in red.

input these settings in the gradient box

then we add some drop shadow: check the image to see the settings i used.

theres the basic text done. now you click "layer>duplicate layer".

in the layer box, you'll see the duplicate layer. right click on in. and press "clear layer style", after that, right click on it, and press "rasterize layer"
after that is done, press Ctrl+I to invert text colour to white.
then, go to Filter> Texture > Stained Glass. dabble around in the settings to get a decent effect.

finally, change the blending mode to either "darken" or "multiply". see pic for reference.

and voila.
open a file in ps, type "sholay" with the appropriate font (i used the one Private_Ryan provided, thanks dude) and click on the "create warped text" icon circled in red in the screenshot.
these are the settings i used for the "warped text"
after pressing "OK" you have your warped text. then press "Ctrl+T" to go into free transform mode. this is where you go wild, drag and increase the height of the text layer, i also squashed it a little bit.
after you're done with that. click "Layer > Layer Style > Gradient Overlay" and click on the gradient which has been circled in red.
input these settings in the gradient box
then we add some drop shadow: check the image to see the settings i used.
theres the basic text done. now you click "layer>duplicate layer".
in the layer box, you'll see the duplicate layer. right click on in. and press "clear layer style", after that, right click on it, and press "rasterize layer"
after that is done, press Ctrl+I to invert text colour to white.
then, go to Filter> Texture > Stained Glass. dabble around in the settings to get a decent effect.
finally, change the blending mode to either "darken" or "multiply". see pic for reference.
and voila.
Powersurge said:
and voila.
wow ..thats perfect man it looks same as the original..
were u da one one who made the banner of original SHOLAY ?
anywayz u got great PS skills ..
faheem_m said:wow ..thats perfect man it looks same as the original..
were u da one one who made the banner of original SHOLAY ?
anywayz u got great PS skills ..
i surely hope not, im not that big a fan of that banner style lol, but thanks
Bumping a 4 yr old thread LOL
vanshilg07
Recruit
The images are not available now so can anyone explain it I need to do it urgentlyok forget that: heres what to do.
open a file in ps, type "sholay" with the appropriate font (i used the one Private_Ryan provided, thanks dude) and click on the "create warped text" icon circled in red in the screenshot.
these are the settings i used for the "warped text"
after pressing "OK" you have your warped text. then press "Ctrl+T" to go into free transform mode. this is where you go wild, drag and increase the height of the text layer, i also squashed it a little bit.
after you're done with that. click "Layer > Layer Style > Gradient Overlay" and click on the gradient which has been circled in red.
input these settings in the gradient box
then we add some drop shadow: check the image to see the settings i used.
theres the basic text done. now you click "layer>duplicate layer".
in the layer box, you'll see the duplicate layer. right click on in. and press "clear layer style", after that, right click on it, and press "rasterize layer"
after that is done, press Ctrl+I to invert text colour to white.
then, go to Filter> Texture > Stained Glass. dabble around in the settings to get a decent effect.
finally, change the blending mode to either "darken" or "multiply". see pic for reference.
and voila.