This is a quick and dirty way to convert your .mkv files to DIVX .avi. and should take an hour or less to convert your movie file, with pretty much the same quality you started with.
Tools you will need:-
If you have a codec pack installed, the first 3 items may already have been installed.
Install these if you don't already have them
-avisynth
-ffdshow
-mkv splitter
Please also install the 3 items below.
-AC-3 ACM codec
-VirtualDub (extract files to the directory of your choice)
-DIVX 6.08 (Even though ffdshow can play this file format, please install this codec anyway.
Install above filters/codecs as necessary.
OK, now to begin
In explorer, Navigate to the Directory where you have your movie file (for the sake of ease, I'll call it "myfile.mkv")
Make a new empty text file and rename it to myfile.avs
(this is just a text file which has had the extension changed from .txt to .avs so that it can be recognized as an avisynth script file)
This will leave you with 2 files..... myfile.mkv and myfile.avs

Open up myfile.avs with notepad and write
where myfile.mkv is the name of your mkv movie file.. you need to put both the " " and the ( ) in the code.
Save and close the .avs file.
(this is just a text file which has had the extension changed from .txt to .avs so that it can be recognized as an avisynth script file)
Now fire up Virtual dub and open up myfile.avs (not the mkv file as it won't open or be readable by VirtualDub)
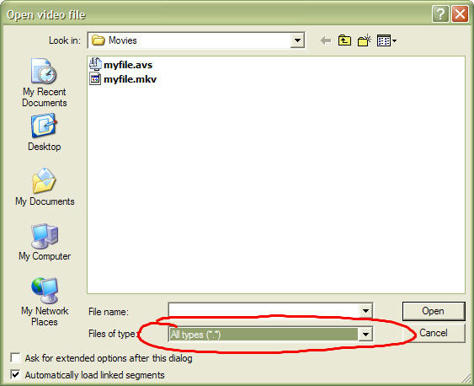
If you are unable to see the file, just click on the down arrow next to "files of type" (see image below) and change to "all types"

Your movie should load without any problems, if there are problems, then something is either not installed or not installed correctly.
VirtualDub
Audio
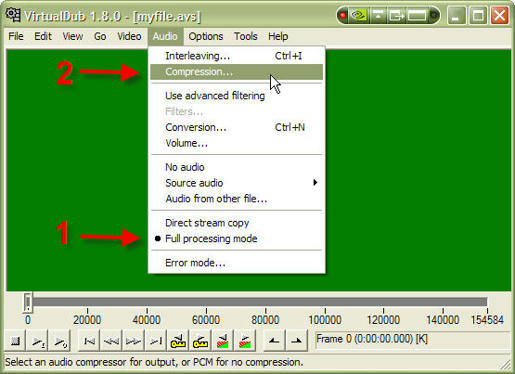
In VirtualDub click on the Audio drop down menu and make sure you have "full processing mode" selected (see image below)
Then click on "compression"

One of the reasons that people encode with mkv, is it's ability to hold lossless audio formats, so it is likely that you have 6 channel (5.1) sound encoded with the file.
Go ahead and select AC-3 ACM codec
(see picture below) this should have been installed earlier.
Then select on the right "256k/bits, 48000 Hz, 5.1 Channels 32KB/s" (See picture below)

Then Click on ok button
Video
In VirtualDub select video drop down menu and make sure you have "full processing mode" selected (see image below)
Then click on "compression"

Select "DIVX 6.8 Codec (2 logical cpu's)"
(Keep in mind that it will only say 2 logical cpus, if you have a dual core processor"

Then on the click on "Configure"
On the first tab "Main" do the following
Select check box "Use presets to configure the encoder"
Slide bar/arrow all the way to the left so it is under speed not quality
leave the default at 1-pass
leave the bitrate at default
In Certification profile, select the profile that matches your input resolution ONLY
For example if you have 720p HD content select "720HD profile"
If you do not have HD content then select Home Theater Profile"

Leave the codec tab alone.. or at defaults
On the Video tab leave everything at defaults and make sure that you are NOT Resizing or select "No resize or format conversion"

Click ok in the DIVX window, and then again in the "select video compression" window
That should about cover all the settings, lets save the file.
In the VirtualDub window, select the File drop down menu, and then Save as AVI... and name your file as usual......

OR
If you have a PS3 and you want to play these files back as DIVX, I believe the files have to be under 2GB, I find that if I make the file sizes 1GB max, I have less problems.
Under the file drop down select "save segmented AVI" (This will split the files into segments)

Then select the segment size, in my case 1024 (this equals 1GB) or 2048 (this equals 2GB) (see below)
Leave both check boxes unchecked and name your file and save it.(see below)

That's it, sit back and wait.....
Oh.. to speed things up a bit one more thing....
In the Render Status window(see below) if you uncheck all boxes, it will speed things up a bit.

The render window you see above is for a 4.5 GB mkv file with the same settings as described above... the time to render approx 43 mins. @ 55-65 frames per second... not too bad
EDIT 03/25/08
Here is an image capture from the converted movie you see in the status window above so you can see the quality of the conversion.
Tools you will need:-
If you have a codec pack installed, the first 3 items may already have been installed.
Install these if you don't already have them
-avisynth
-ffdshow
-mkv splitter
Please also install the 3 items below.
-AC-3 ACM codec
-VirtualDub (extract files to the directory of your choice)
-DIVX 6.08 (Even though ffdshow can play this file format, please install this codec anyway.
Install above filters/codecs as necessary.
OK, now to begin
In explorer, Navigate to the Directory where you have your movie file (for the sake of ease, I'll call it "myfile.mkv")
Make a new empty text file and rename it to myfile.avs
(this is just a text file which has had the extension changed from .txt to .avs so that it can be recognized as an avisynth script file)
This will leave you with 2 files..... myfile.mkv and myfile.avs

Open up myfile.avs with notepad and write
Code:
DirectShowSource ("myfile.mkv")Save and close the .avs file.
(this is just a text file which has had the extension changed from .txt to .avs so that it can be recognized as an avisynth script file)
Now fire up Virtual dub and open up myfile.avs (not the mkv file as it won't open or be readable by VirtualDub)
If you are unable to see the file, just click on the down arrow next to "files of type" (see image below) and change to "all types"

Your movie should load without any problems, if there are problems, then something is either not installed or not installed correctly.
VirtualDub
Audio
In VirtualDub click on the Audio drop down menu and make sure you have "full processing mode" selected (see image below)
Then click on "compression"

One of the reasons that people encode with mkv, is it's ability to hold lossless audio formats, so it is likely that you have 6 channel (5.1) sound encoded with the file.
Go ahead and select AC-3 ACM codec
(see picture below) this should have been installed earlier.
Then select on the right "256k/bits, 48000 Hz, 5.1 Channels 32KB/s" (See picture below)

Then Click on ok button
Video
In VirtualDub select video drop down menu and make sure you have "full processing mode" selected (see image below)
Then click on "compression"

Select "DIVX 6.8 Codec (2 logical cpu's)"
(Keep in mind that it will only say 2 logical cpus, if you have a dual core processor"

Then on the click on "Configure"
On the first tab "Main" do the following
Select check box "Use presets to configure the encoder"
Slide bar/arrow all the way to the left so it is under speed not quality
leave the default at 1-pass
leave the bitrate at default
In Certification profile, select the profile that matches your input resolution ONLY
For example if you have 720p HD content select "720HD profile"
If you do not have HD content then select Home Theater Profile"

Leave the codec tab alone.. or at defaults
On the Video tab leave everything at defaults and make sure that you are NOT Resizing or select "No resize or format conversion"

Click ok in the DIVX window, and then again in the "select video compression" window
That should about cover all the settings, lets save the file.
In the VirtualDub window, select the File drop down menu, and then Save as AVI... and name your file as usual......

OR
If you have a PS3 and you want to play these files back as DIVX, I believe the files have to be under 2GB, I find that if I make the file sizes 1GB max, I have less problems.
Under the file drop down select "save segmented AVI" (This will split the files into segments)

Then select the segment size, in my case 1024 (this equals 1GB) or 2048 (this equals 2GB) (see below)
Leave both check boxes unchecked and name your file and save it.(see below)

That's it, sit back and wait.....
Oh.. to speed things up a bit one more thing....
In the Render Status window(see below) if you uncheck all boxes, it will speed things up a bit.

The render window you see above is for a 4.5 GB mkv file with the same settings as described above... the time to render approx 43 mins. @ 55-65 frames per second... not too bad

EDIT 03/25/08
Here is an image capture from the converted movie you see in the status window above so you can see the quality of the conversion.


