Guide I need some guide to make a headless mod in my laptop.

bunnxr

Enclave Plus
Contributor
For the basics, a headless laptop is laptop which has it's display removed and is used with only the base motherboard, keyboard and trackpad.
Since i had a problem in my Lenovo Legion Y540, i am planning to do so in it. But i have no clue how to..

If anyone has done that, i'd appreciate some info on the process. I also have a question regarding the bios display over the HDMI rather than falling
over to the primary laptop display. Also some workaround's regarding the webcam.

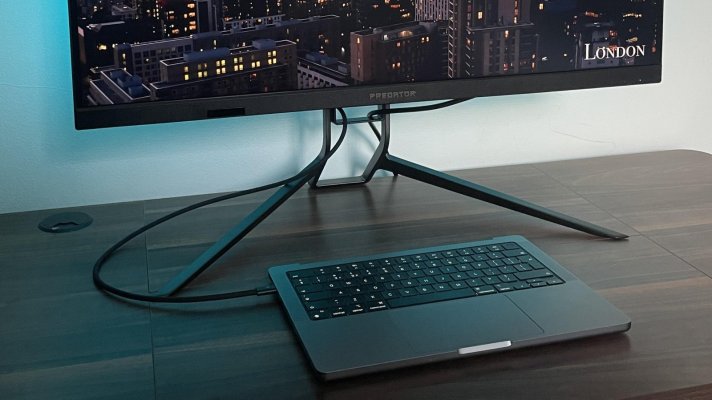
Below is an example for the same
 

Attachments

  • headless.jpg
    headless.jpg
    221.7 KB · Views: 54
One cool suggestion could be getting a Type C Dock (if your laptop has a type c port), and if not, get a Type A Dock.

A dock usually comes with two USB ports, 1 type C port, HDMI, AUX, Micro SD Card, Ethernet, and a few more.
This way, only 1 cable goes out of the laptop to the dock, and all necessary cables connect to the dock, rather than the laptop. This leads to better cable management across the setup, and good looks.

Or else put the laptop's lower half in a box, and connect all cables to it, and put it under the table.
Again good looks, and cheaper (as no need to invest on dock).

Coming to webcam, its a PITA to use that webcam from the monitor again, would take lot of efforts to do it, rather get a usb webcam for like 500.
I want to carry this thing with me abroad, because this is a good machine all i want is to remove that display and work nicely. i do use it via a Dock. Lucky for me all the ports on this machine are behind.
 
It's easy. Google your model number + teardown (or display change/ram change something change), learn how to open the backplate.

Once the backplate is open, you should see atleast 2 cables going through the hinge into the lid (aka display). These will be the display cable and the camera cable. Remove them. Now don't close everything back up. Connect your peripherals and check if the laptop works as is. If it refuses to boot, you might have to open the lid a little (to trick the laptop into thinking the lid's off).

Most laptops show all settings on the external display (including BIOS), especially when the primary display is not present (aka the display cable we detached)

Once you've confirmed it's working, remove the lid (varies by model, but is mostly self explanatory). You'll have 3 or 4 screws that hold the hinge in place, just unscrew them.

With this, you're done.

CONGRATULATIONS!!!

Your laptop is now headless.

However, be prepared to answer questions especially if you're going abroad and passing customs/security checks, because by nature people are intrigued about things they don't see daily.
 
I want to carry this thing with me abroad, because this is a good machine all i want is to remove that display and work nicely. i do use it via a Dock. Lucky for me all the ports on this machine are behind.
If ports are on back, its all good, you can use them all, and that too without the cables appearing in front.

For the webcam, you need little bit of tweaking, an it shuld start working, as only the camera cables need to be connected, display not mandatory.
 
  • Like
Reactions: bunnxr
It's easy. Google your model number + teardown (or display change/ram change something change), learn how to open the backplate.

Once the backplate is open, you should see atleast 2 cables going through the hinge into the lid (aka display). These will be the display cable and the camera cable. Remove them. Now don't close everything back up. Connect your peripherals and check if the laptop works as is. If it refuses to boot, you might have to open the lid a little (to trick the laptop into thinking the lid's off).

Most laptops show all settings on the external display (including BIOS), especially when the primary display is not present (aka the display cable we detached)

Once you've confirmed it's working, remove the lid (varies by model, but is mostly self explanatory). You'll have 3 or 4 screws that hold the hinge in place, just unscrew them.

With this, you're done.

CONGRATULATIONS!!!

Your laptop is now headless.

However, be prepared to answer questions especially if you're going abroad and passing customs/security checks, because by nature people are intrigued about things they don't see daily.
that's really good to know, am grateful to you mate. good grief on the customs thing maybe ill just try doing it for now then reconnect just the lid and do the same there again.

: P
 
Last edited:
ill just try doing it for now then reconnect just the lid and do the same there again.

Be careful, laptop screws have a tendency to strip out easily and these are not actually intended to be used like a USB port (ie.) Multiple connections and disconnections).

You might need to spend a few extra minutes explaining what it is, but after that it shouldn't be a problem.

Also, as TechnologyHell pointed out, the camera can be made to work without the display, but do note that the cable length will be limited and your jugaad will need to account for that. Cable extension isn’t really possible. A USB camera makes more sense in my opinion.

All the best and if you end up doing it, share photos. :D
 
Also, as @TechnologyHell pointed out, the camera can be made to work without the display, but do note that the cable length will be limited and your jugaad will need to account for that. Cable extension isn’t really possible. A USB camera makes more sense in my opinion.
Yes, the exact reason why I recommended a USB camera.
Internal camera gonna have really really small wire, which would not be worth the efforts, rather a usb one comes with nearly 2meter long cable, perfect for the needs
 
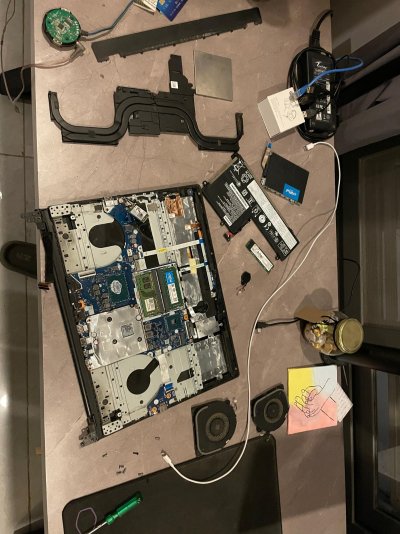
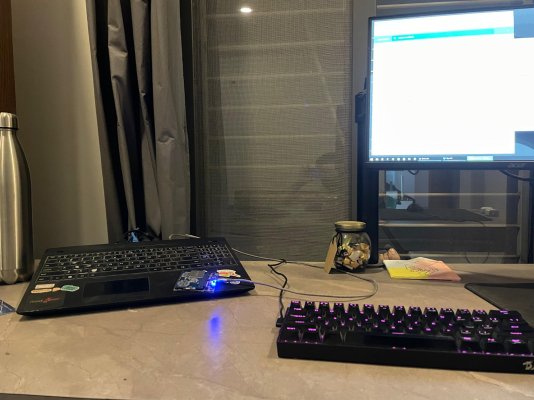
@badwhitevision @TechnologyHell i did it last night and i was successful. i did everything fine, bios appeared in the monitor and everything worked flawlessly until windows booted and i couldn't get the display. After some work i got to know that i have to change a bios setting that my laptop uses to 'switchable graphics' (internal and discrete both) to power the primary panel, rather than 'discrete graphics' option i had turn on. After which i got the display and everything works fine. i dont think i require the webcam too much so ill live without it.

I don't know if it was worth it, as that display wasn't in good condition but it did work. I used to have it sit for hours so that it becomes usable. I used to use multi monitor setup with it.

But i can really say. I enjoyed doing it and this definitely is the way to go now.
 

Attachments

  • WhatsApp Image 2025-01-03 at 15.56.55_2ed6bfe5.jpg
    WhatsApp Image 2025-01-03 at 15.56.55_2ed6bfe5.jpg
    373.8 KB · Views: 36
  • WhatsApp Image 2025-01-03 at 15.56.55_011be36e.jpg
    WhatsApp Image 2025-01-03 at 15.56.55_011be36e.jpg
    293.6 KB · Views: 36
Let's go mate!
There I see some success!!

BTW what is this little thing ?
View attachment 219128
that’s an internal ssd i turned to external with sata to usb enclosure from amazon, took its pcb nailed the ssd and joined together with an open diy enclosure : )

next i might get a big heat shrink and enclose them. some 256gb with ventoy in it to boot linux and WinPE with good 500 read and write speed.
 
  • Like
Reactions: TechnologyHell
that’s an internal ssd i turned to external with sata to usb enclosure from amazon, took its pcb nailed the ssd and joined together with an open diy enclosure : )

next i might get a big heat shrink and enclose them. some 256gb with ventoy in it to boot linux and WinPE with good 500 read and write speed.
Cool idea
Instead of just a heat shrink, get a quick case cut out of pvc sheet or 3d print one. It would be a really cool small sized external ssd
 
Cool idea
Instead of just a heat shrink, get a quick case cut out of pvc sheet or 3d print one. It would be a really cool small sized external ssd
can do, all i wanted was small and slim external ssd so i didn’t go hard way. i placed a metal shell of the ssd below the pcb and stick it together with double sided tape.