Photography school
- Thread starter -D.Payne-
- Start date
You are using an out of date browser. It may not display this or other websites correctly.
You should upgrade or use an alternative browser.
You should upgrade or use an alternative browser.
- Status
- Not open for further replies.
Payne how do click the below photos and what settings are used.Is it possible to click the same in a FZ35??.


PS: Can please post a high resolution image of the Taj Mahal pic you clicked


PS: Can please post a high resolution image of the Taj Mahal pic you clicked
Krow said:Photograph #1

Exif Info:
Make - Sony
Model - DSC-H50
ExposureTime - 1/640 seconds
FNumber - 8
ISOSpeedRatings - 80
MaxApertureValue - F 2.875
No Flash
White Balance - Auto
Focal Length 5mm (Auto focus)
Location: Some mountain about 20-30km from Leh in the Zanskar mountain range, Ladakh, J&K, India.
Time: 11.52.20 AM, 19.12.09.
Composition: Straightaway there's an issue with the image being split into two halves - white ground and blue sky. The mountain sits in the centre.
A better idea would have been to go either lower on the angle to include more sky or point the camera downward to make the mountain your background with a hint of sky.
Lighting: Natural here, so nothing much you could do.
Camera settings: Hmmm. This is an obvious case of your camera metering for the highlights - the snow. Do you notice how "dirty" the snow looks? All grey and no real white and life in it?
You could have over-exposed the shot by increasing exposure compensation by 0.7-1.0
Post-processing: Now this is where the meat is. Firstly, increase both contrast and exposure in the scene.
How can you do this?
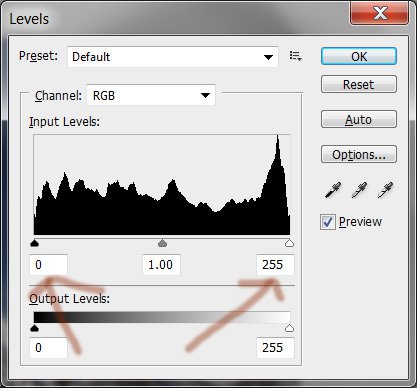
The simplest way is to use the LEVELS tool in a software like Photoshop.
Drag the left slider towards the right to increase the black levels and drag the right slider to the left to increase the white levels. That should give you a well contrasted image with snow which looks WHITE instead of grey.
Next, crop the image. Either choose a 16:9 ratio or anything which makes you comfortable. Change the boring-ness aspect of the image through cropping.
How would I have done this?
I would have shot lower to get in more of the sky. That's a fabulous sky with some brilliant blue and clouds. I might even have shot a Panorama here to get the ends of the mountain in the frame.
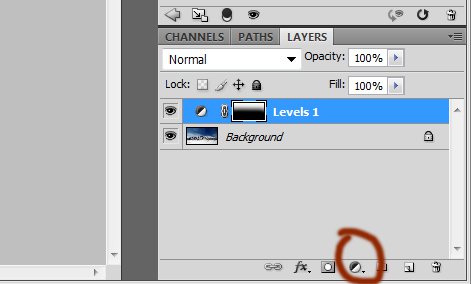
In Post-processing, I would have added a Adjustment Layers mask of Levels to darken the sky further while keeping the whites of the snow intact. This will give me rich deep blue in the sky.
An Adjustment Layer is a layer of adjustments (duh) over the background that you can apply either to the whole image or to certain parts by using brushes.
Click on the circled button shown above and choose LEVELS and adjust the levels to darken the sky (pull right slider to left, pull middle slider to right). The whole image goes darker now.
Now,
- choose a brush with a lot of softness and set foreground color to BLACK
- Paint on the Adjustment Layer near the mountain. This will brush away the darkness Levels layer and bring the mountain back to its previous bright levels. Do NOT paint on the Sky!
I also increased the sky part through some quick Liquify/Clone stamping in Photoshop.
My final image looks like this:

And the B&W:

Cheers!
Payne
Attachments
Excellent thread D.Payne.
Can we take great pics without using Photoshop and other editing software? Just manual settings and sensor (instead of film) with a dslr?
Just like the ones we see that were taken using fully manual slr cameras years back?
Or were they using some post-processing work then also?
Can we take great pics without using Photoshop and other editing software? Just manual settings and sensor (instead of film) with a dslr?
Just like the ones we see that were taken using fully manual slr cameras years back?
Or were they using some post-processing work then also?
Awesome efforts Payne...
Kudos...
This will make a photo enthusiast like me to survive between the comp geeks in the TE... hyeah:
______________
BTW, I hope U wont mind if I add my 2 cents to any of your answer... will you!!! :ashamed:
KEEP ROCKING
Kudos...
This will make a photo enthusiast like me to survive between the comp geeks in the TE...
 hyeah:
______________
BTW, I hope U wont mind if I add my 2 cents to any of your answer... will you!!! :ashamed:
KEEP ROCKING
maddy_in65
Forerunner
Excellent intiative payne!!! Your effort really appreaciated :hap2:.
I always read your tips on photography as i like photography. I have pruchased Canon 500D recently. I had opened thread at that time for suggestion and you have given some good tips. After playing with 500D, i realised that i am not a so good photographer .
.
Then i am thinking of joining a 1 or 2 day seminar which gives me some tips to hand DSLR effeciently. Now i think this will help me to increase my skills. I will post some snaps soon.
I always read your tips on photography as i like photography. I have pruchased Canon 500D recently. I had opened thread at that time for suggestion and you have given some good tips. After playing with 500D, i realised that i am not a so good photographer
 .
. Then i am thinking of joining a 1 or 2 day seminar which gives me some tips to hand DSLR effeciently. Now i think this will help me to increase my skills. I will post some snaps soon.
^^^Maddy you do not need seminar. Trust me it takes some time to get used to a DSLR.
It is a complex piece of technology.
I'll suggest if you are struggling study a book "Understanding Exposure" by Bryan Peterson.
Good for beginners and you might find it easy to pick up.
PS:- Keep taking loads of photos and analyse them. Oh and do not forget to have fun in the process .
.
HTH
I hope Payne will not mind me jumping in between . Please feel free to correct me.
To answer your query, in old days SLR film used to be developed. I have personally used B/W film SLRs and developed snaps myself in lightroom around 12 yrs back.
In modern days digital post processing is equal to the developing technique of lightroom with film SLRs.
That said, you can take really good photos even without any digital post processing.
HTH
It is a complex piece of technology.
I'll suggest if you are struggling study a book "Understanding Exposure" by Bryan Peterson.
Good for beginners and you might find it easy to pick up.
PS:- Keep taking loads of photos and analyse them. Oh and do not forget to have fun in the process
 .
.HTH

abbis said:Excellent thread D.Payne.
Can we take great pics without using Photoshop and other editing software? Just manual settings and sensor (instead of film) with a dslr?
Just like the ones we see that were taken using fully manual slr cameras years back?
Or were they using some post-processing work then also?
I hope Payne will not mind me jumping in between
 . Please feel free to correct me.
To answer your query, in old days SLR film used to be developed. I have personally used B/W film SLRs and developed snaps myself in lightroom around 12 yrs back.
In modern days digital post processing is equal to the developing technique of lightroom with film SLRs.
That said, you can take really good photos even without any digital post processing.
HTH

ImageDescription :
Make : Canon
Model : Canon PowerShot SX110 IS
ExposureTime : 1/1250Sec
FNumber : F4.0
ISOSpeedRatings : 100
ExposureBiasValue : EV0.0
MeteringMode : Division
Flash : Not fired(Compulsory)
ExposureMode : Auto
WhiteBalance : Manual
Time of day : Afternoon
I like to photograph people and streets more.... More Urban Environment
Students!  Sorry for my absence from this thread, work has kept me busy. I'll return with my answer to logisto's and ronnie's photographs by tonight.
Abbis, there was always post-processing involved. A lot of people will quote Ansel Adams and say "You don't take a photograph, you make it."
I'll simply tell you that ANY camera can NEVER match what your eye sees. It can't match the color, contrast, dynamic range, emotion (that you want to convey), mood (of the situation) and your own artistic expression. So yes, even "photojournalistic" shots have some amount of post-processing if only to ensure contrast/color.
The truth is that whatever settings you put on your camera, it is still making the decisions for you...while with PP, you're making the decisions and hence making the shot. That said, here's a line to make you realize how important composition and timing are the most important elements in any photograph:
"Photography is 5% skill, 5% technique & tool, and 90% being there."
Believe it.
@Metalspree
Shot #1 is a very long exposure shot (1hr-ish) that can also be taken with a series of 30 sec exposures merged together using software like Star Trails.
So yes, you can do with a P&S - one with a fully Manual Mode which lets you shoot at 30-60 seconds.
Shot #2 is done by light painting and can also be done with a P&S with a Manual mode. Simple: long exposure (of around 10 seconds) with the model standing still while you paint the light around the model with an LED torch or similar device.
There you go!
Payne
 Sorry for my absence from this thread, work has kept me busy. I'll return with my answer to logisto's and ronnie's photographs by tonight.
abbis said:Excellent thread D.Payne.
Can we take great pics without using Photoshop and other editing software? Just manual settings and sensor (instead of film) with a dslr?
Just like the ones we see that were taken using fully manual slr cameras years back?
Or were they using some post-processing work then also?
Abbis, there was always post-processing involved. A lot of people will quote Ansel Adams and say "You don't take a photograph, you make it."
I'll simply tell you that ANY camera can NEVER match what your eye sees. It can't match the color, contrast, dynamic range, emotion (that you want to convey), mood (of the situation) and your own artistic expression. So yes, even "photojournalistic" shots have some amount of post-processing if only to ensure contrast/color.
The truth is that whatever settings you put on your camera, it is still making the decisions for you...while with PP, you're making the decisions and hence making the shot. That said, here's a line to make you realize how important composition and timing are the most important elements in any photograph:
"Photography is 5% skill, 5% technique & tool, and 90% being there."
Believe it.

@Metalspree
Shot #1 is a very long exposure shot (1hr-ish) that can also be taken with a series of 30 sec exposures merged together using software like Star Trails.
So yes, you can do with a P&S - one with a fully Manual Mode which lets you shoot at 30-60 seconds.
Shot #2 is done by light painting and can also be done with a P&S with a Manual mode. Simple: long exposure (of around 10 seconds) with the model standing still while you paint the light around the model with an LED torch or similar device.

There you go!
Payne
Thanks a lot for the advice Payne. I liked the PP you have done, even though I am not very comfortable the idea with modifying the picture with clone stamp. I am fine with exposure correction, etc. However, you have taught me a lot about basic post processing technique, which I used a bit in the panoramic picture posted below. Could you please advise me about this effort?
Krow said:Here is my first ever try at a panoramic shot. Comprises of four images, one auto stitching software, Adobe Photoshop CS3 levels adjustment layer and contrast and brightness adjustments and last but not least, some cropping. The shots were taken in Ladakh, the view is of Leh Airport and the surrounding scenery. I have not used a tripod for this one, as may be evident.

my very first out-of-the-pack click with 1000D 

Settings
ISO: 400
Exposure: 1/60 sec
Aperture: 4.5
Focal Length: 35mm
Flash Used: Yes
Expected and my Analysis
> lighter at focus at starting from extreme left and very little gap starting from the center and Cig pack at the right extreme background visibly blurred to an extent where the "cancer" sign is visible - took some 10-15 shots to get my satisfaction...
> couldnt get the lighter starting from the extreme left and keep it at focus (amateur's prbs :ashamed
> Used flash to get the Silvery Scratches like those that can be found around left/right of the letter "I".
> but got over exposed at the top and under exposed below "I"
> I couldnt find a way to get those silvery scratch effect distributed eventually
around the lighter.
> Flash is not even may be coz i was very close to the object due to the
limitations of the kit lens.
> Shot at Aperture Value mode.
Apart from the pending critics from ya
have this one doubt...
||
||
\/
As per the details what i have been gathering around, at smaller aperture, DOF will be more...
But here with aperture 4.5, the DOF stays right at the focus plane(lighter) and the rest are left out of DOF.
Shouldn't the background be atleast, a little sharper?
P.S: with my recent practical understanding with the help of some 100-200 waste shots since last night :hap2: , i feel that aperture from 3 - 5.6 is normal/average...
----------------------
my ears wide open...
your turn bro

Settings
ISO: 400
Exposure: 1/60 sec
Aperture: 4.5
Focal Length: 35mm
Flash Used: Yes
Expected and my Analysis
> lighter at focus at starting from extreme left and very little gap starting from the center and Cig pack at the right extreme background visibly blurred to an extent where the "cancer" sign is visible
 - took some 10-15 shots to get my satisfaction...
> couldnt get the lighter starting from the extreme left and keep it at focus (amateur's prbs :ashamed

> Used flash to get the Silvery Scratches like those that can be found around left/right of the letter "I".
> but got over exposed at the top and under exposed below "I"
> I couldnt find a way to get those silvery scratch effect distributed eventually
around the lighter.
> Flash is not even may be coz i was very close to the object due to the
limitations of the kit lens.
> Shot at Aperture Value mode.
Apart from the pending critics from ya

have this one doubt...
||
||
\/
As per the details what i have been gathering around, at smaller aperture, DOF will be more...
But here with aperture 4.5, the DOF stays right at the focus plane(lighter) and the rest are left out of DOF.
Shouldn't the background be atleast, a little sharper?
P.S: with my recent practical understanding with the help of some 100-200 waste shots since last night :hap2: , i feel that aperture from 3 - 5.6 is normal/average...
----------------------
my ears wide open...
your turn bro

You're right when you say DOF is more at smaller apertures. The only thing you need to understand is that smaller apertures have higher f values. Aperture at f/5.6 is smaller than that at f/4.5, f/8 is smaller than f/5.6 and so on. So, to have greater DOF, you could try shooting at f/8.madcrazyboys said:Apart from the pending critics from ya
have this one doubt...
||
||
\/
As per the details what i have been gathering around, at smaller aperture, DOF will be more...
But here with aperture 4.5, the DOF stays right at the focus plane(lighter) and the rest are left out of DOF.
Shouldn't the background be atleast, a little sharper?
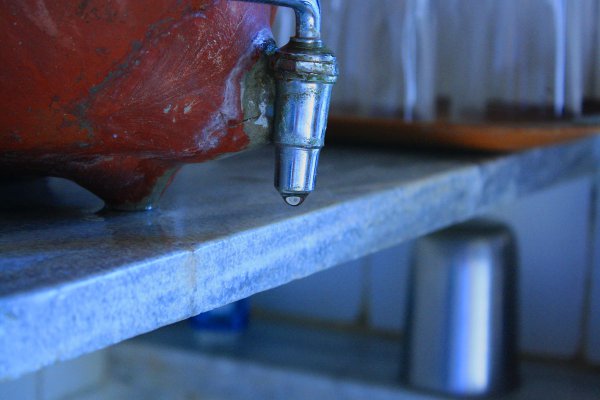
my 2 centsAces170 said:My first try at taking some decent photos. I am yet unable to use the manual controls, this was taken using semi manual controls, and using manual focus.
the glass in the background is very distracting, you could crop out 40% of the right side of the photo as itdoes nothing.
Alternatively, could have taken more of the matka or closed up on the waterdrop
Everything is too blue....you could set whitebalance to fluorescent
Example of whitebalance: White Balance Examples
Could have tried making the drop as big as possible
deathvirus_me said:
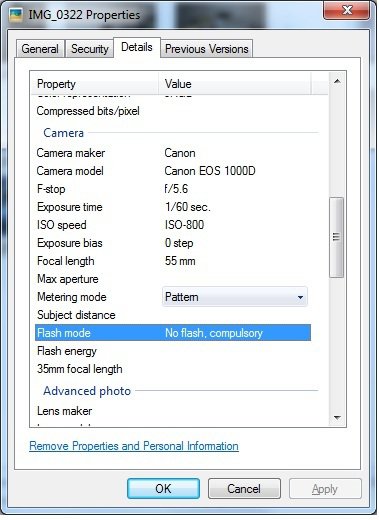
The shot is over exposed, decrease the ISO and increase the shutter speed. Also try hands on Photoshop too, an essential for any photographer, the colors could be more richer or vivid..
Using the auto levels, and exposure settings on PS:

Uploaded with ImageShack.us
The picture would be sharper if ISO setting was at 100, and shutter speed increased further. My 2 cents
- Status
- Not open for further replies.


