
Today we will be un-boxing and taking a close look at the brand new Gigabyte x99 Soc Champion Motherboard. Designed by Gigabyte in conjunction with world class overclockers Hi-coockie and Sofos to rule the overclocking arena.
One of the biggest features of the X99-SOC Champion is the use of a slightly different 2011v3 socket. This socket contains 2083 pins rather than the standard 2011 and offers several new options for adjusting specific voltages in the BIOS, and lets one bypass the FIVR built into the CPU. These extra pins are enabled via a DIP Switch on the motherboard, but their relevance is only towards the liquid nitrogen users or extreme overclockers.
in December GIGABYTE hosted several world class extreme overclockers at their OC Lab to join in-house overclockers HiCookie and Sofos to break as many world records as possible. They came out with 9 world records and 17 other first places in various benchmarks.. pretty impressive I must say!
Besides the OC socket, the X99-SOC Champion is very well equipped due to the fact that is belongs to the X99 platform which Intel calls the Enthusiast/Ultra High End line up.
Special care has been taken through the entire design phase of this motherboard for extreme overclocking. Right from the easy to insulate socket area because it has been kept devoid of any pesky capacitors and with the onboard buttons allowing for quick resets, voltage checking and BIOS adjustments. Also a new addition to the GIGABYTE Soc Champion is an onboard header for GIGABYTE's X99 overclock panel, which is sold separately and which allows for external control of all the important bios parameters .
Just because the pricing of this board is on the cheaper side.. ( cant really say cheap and x99 in the same sentence but its relative) does not mean that any functionality has been skimpered on. Gigabyte has given us enough bandwidth for a full four-way GPU setup, giving x16/x16/x8 for triple SLI/CF and x16/x8/x8/x8 for 4 way Sli /CF, along with the full set of 10 PCH SATA ports, a SATA Express port and an M.2 2.0 x4 slot. We also get six USB 3.0 in total, a Thunderbolt connection header and three PCIe 2.0 x1 slots which share bandwidth with the M.2 2.0x4 slot. On the back panel we also get an Intel I218-V network port alsong with the Audio outputs that come from the custom AMP-UP audio processor, which in essence is an upgraded Realtek ALC1150 DSP.
When watercooling the cpu, there is generally a lack of airflow around the Mosfets/Vrm’s . It is for this purpose, that Gigabyte has given us 2 massive heatsinks connected via heatpipes to cool the VRM’s even without much airflow. This is to ensure absolute stability even under harsh conditions. There are four separate heatsinks in total, with two of them flanking the DDR4 memory slots on the left and right of the slots. The heatsinks are pretty aesthetically pleasing and work really well, not to mention they are freaking heavy.
The Box.. Says Champion on the outside !
The feature set is printed very clearly on the back of the box.

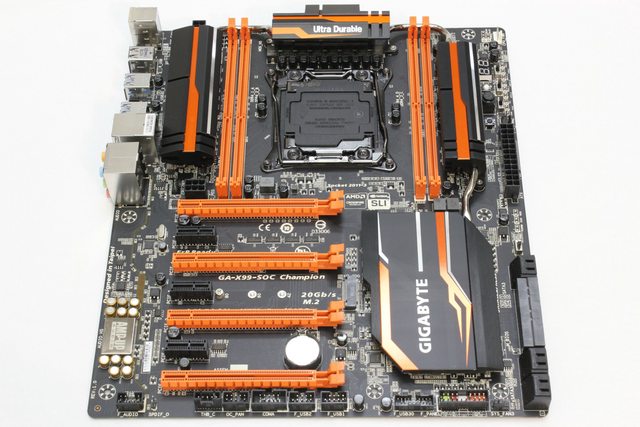
And these he is.. the Champ.!!

This is the accessory bundle provided with the motherboard.

First glimpse.... ain't he a brute ?
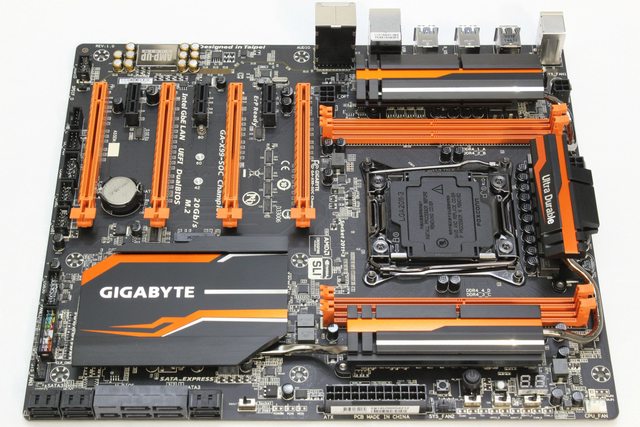
Side profile... beauty shot
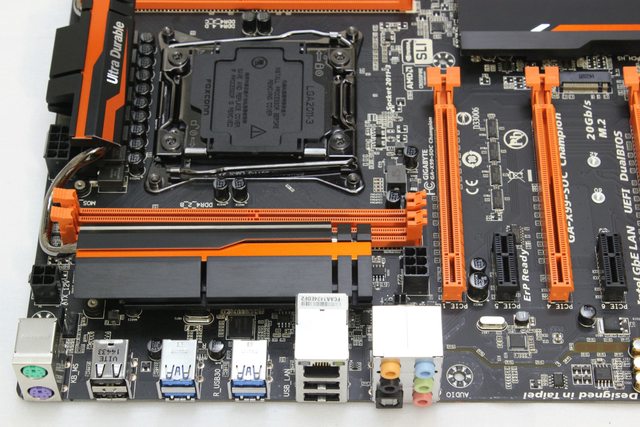
Here we can the I/O on the back panel and the separate Audio Section . Good to see 2x PS2 ports. This alone tells you that this board is aimed at the crazy overclocking bunch. USB can act very weird when seriously pushing the system under LN2 and overclocking the pci-e bus and BCLK.

here we can see the 2x 12V CPU power connectors.1x 8-pin and 1x 4-pin should provide for more than enough just for even the big bad boy from Intel, the i7 5960x can really suck on power when running over 5+ ghz and this PWM and power delivery subsystem is totally up to the task.

A closer look at the I/O on the backpanel.
Here we can see the 4x Pci-e x16 slots and the 3x Pci-e 1x slots. Also note the 6-pin PCI-e Power connector above the first slot. Also we can clearly see the separate audio section. This whole section lights up when the board is powered up and looks quite slick.

Note the tiny headers all the way at the bottom of the board called THB_C and OC_Pan, they are for the Thunderbolt Add-on card and the Gigabyte OC-Panel respectively.

On the right side we have the Power/Reset/HDD connections and also a USB 3.0 header along with a fan header.

That is one chunky heatsink !!!

Flip this switch for Magic !! This unlocks several voltage options in the bios and is the key to this awesome motherboard. This lets us clock the crap out of the DRAM and the CPU Cache by bypassing the FIVR on the Intel CPU.

Here we have the Clear CMOS button, The power button and the Reset button. Below them are 3 switches. These are for a BIOS selection , a DualBIOS enabling switch and a OC Trigger Switch (LN2 Mode).All an extreme overclocker needs at his fingertips.

Another shot of the switches and Debug LED. Also note the voltage measurement points .

The socket area is as clean as can be and should be no big problem to insulate when going extreme. Also note the heatsinks.. This thing looks like bumble bee from transformers !!

Pins.. pins everywhere... 2083 of them to be precise. This ain't your regular run of the mill 2011v3 socket people !!
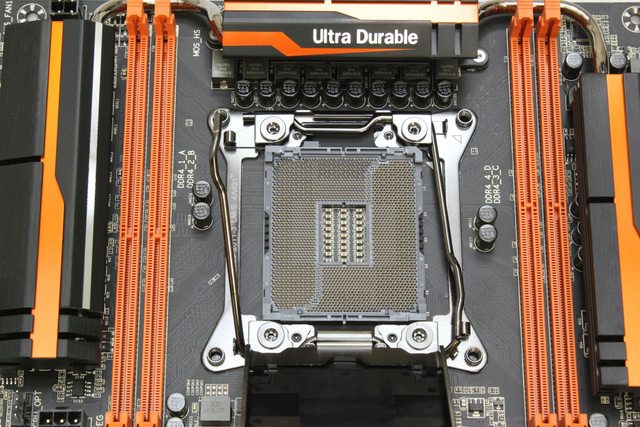
Another close up shot of the socket.. mmmm stunning !!! The socket and slots also come with 30 micron gold contacts which is 6x more than standard and 2x more than most of the competition, to improve longevity against constant replacement as well as corrosion.

Here we can see the hefty VRM / PWM design this board employ's.


This is one hefty Southbridge heatsink.. looks stunning !!
Stay tuned for a detailed test report
Thanks for looking guys !
Kind regards always!
One of the biggest features of the X99-SOC Champion is the use of a slightly different 2011v3 socket. This socket contains 2083 pins rather than the standard 2011 and offers several new options for adjusting specific voltages in the BIOS, and lets one bypass the FIVR built into the CPU. These extra pins are enabled via a DIP Switch on the motherboard, but their relevance is only towards the liquid nitrogen users or extreme overclockers.
in December GIGABYTE hosted several world class extreme overclockers at their OC Lab to join in-house overclockers HiCookie and Sofos to break as many world records as possible. They came out with 9 world records and 17 other first places in various benchmarks.. pretty impressive I must say!
Besides the OC socket, the X99-SOC Champion is very well equipped due to the fact that is belongs to the X99 platform which Intel calls the Enthusiast/Ultra High End line up.
Special care has been taken through the entire design phase of this motherboard for extreme overclocking. Right from the easy to insulate socket area because it has been kept devoid of any pesky capacitors and with the onboard buttons allowing for quick resets, voltage checking and BIOS adjustments. Also a new addition to the GIGABYTE Soc Champion is an onboard header for GIGABYTE's X99 overclock panel, which is sold separately and which allows for external control of all the important bios parameters .
Just because the pricing of this board is on the cheaper side.. ( cant really say cheap and x99 in the same sentence but its relative) does not mean that any functionality has been skimpered on. Gigabyte has given us enough bandwidth for a full four-way GPU setup, giving x16/x16/x8 for triple SLI/CF and x16/x8/x8/x8 for 4 way Sli /CF, along with the full set of 10 PCH SATA ports, a SATA Express port and an M.2 2.0 x4 slot. We also get six USB 3.0 in total, a Thunderbolt connection header and three PCIe 2.0 x1 slots which share bandwidth with the M.2 2.0x4 slot. On the back panel we also get an Intel I218-V network port alsong with the Audio outputs that come from the custom AMP-UP audio processor, which in essence is an upgraded Realtek ALC1150 DSP.
When watercooling the cpu, there is generally a lack of airflow around the Mosfets/Vrm’s . It is for this purpose, that Gigabyte has given us 2 massive heatsinks connected via heatpipes to cool the VRM’s even without much airflow. This is to ensure absolute stability even under harsh conditions. There are four separate heatsinks in total, with two of them flanking the DDR4 memory slots on the left and right of the slots. The heatsinks are pretty aesthetically pleasing and work really well, not to mention they are freaking heavy.
The Box.. Says Champion on the outside !
The feature set is printed very clearly on the back of the box.
And these he is.. the Champ.!!
This is the accessory bundle provided with the motherboard.
First glimpse.... ain't he a brute ?
Side profile... beauty shot
Here we can the I/O on the back panel and the separate Audio Section . Good to see 2x PS2 ports. This alone tells you that this board is aimed at the crazy overclocking bunch. USB can act very weird when seriously pushing the system under LN2 and overclocking the pci-e bus and BCLK.
here we can see the 2x 12V CPU power connectors.1x 8-pin and 1x 4-pin should provide for more than enough just for even the big bad boy from Intel, the i7 5960x can really suck on power when running over 5+ ghz and this PWM and power delivery subsystem is totally up to the task.
A closer look at the I/O on the backpanel.
Here we can see the 4x Pci-e x16 slots and the 3x Pci-e 1x slots. Also note the 6-pin PCI-e Power connector above the first slot. Also we can clearly see the separate audio section. This whole section lights up when the board is powered up and looks quite slick.
Note the tiny headers all the way at the bottom of the board called THB_C and OC_Pan, they are for the Thunderbolt Add-on card and the Gigabyte OC-Panel respectively.
On the right side we have the Power/Reset/HDD connections and also a USB 3.0 header along with a fan header.
That is one chunky heatsink !!!
Flip this switch for Magic !! This unlocks several voltage options in the bios and is the key to this awesome motherboard. This lets us clock the crap out of the DRAM and the CPU Cache by bypassing the FIVR on the Intel CPU.
Here we have the Clear CMOS button, The power button and the Reset button. Below them are 3 switches. These are for a BIOS selection , a DualBIOS enabling switch and a OC Trigger Switch (LN2 Mode).All an extreme overclocker needs at his fingertips.
Another shot of the switches and Debug LED. Also note the voltage measurement points .
The socket area is as clean as can be and should be no big problem to insulate when going extreme. Also note the heatsinks.. This thing looks like bumble bee from transformers !!
Pins.. pins everywhere... 2083 of them to be precise. This ain't your regular run of the mill 2011v3 socket people !!
Another close up shot of the socket.. mmmm stunning !!! The socket and slots also come with 30 micron gold contacts which is 6x more than standard and 2x more than most of the competition, to improve longevity against constant replacement as well as corrosion.
Here we can see the hefty VRM / PWM design this board employ's.
This is one hefty Southbridge heatsink.. looks stunning !!
Stay tuned for a detailed test report
Thanks for looking guys !
Kind regards always!