
With a increasing number of computers and laptops inside each house, the need to share a single printer across the house has become increasingly necessary. I personally have a office laptop, a desktop and my wife has a laptop; it is a complete pain trying to attach the printer to each of them and print stuff as we need.
One simple solution is to attach the printer to the home machine and share it on the network and have your laptops print to the network printer. I do not like the solution because every time you need to print anything from any place, you need to boot up he machine where the printer is attached.
So a wireless printer is the solution. A wireless inkjet printer itself is very expensive, the moment you need a wireless laser printer, the price complete goes insane. Made me think, there must be a simple way to get to share one printer across the network in such a way that I can place it anywhere and print from any machine. I personally have the Samsung ML-1666 Laser printer.
The tried and cheap Asus Routers with a USB port come to the rescue. Some of them allow you to share printers with a default firmware they ship with, but the default firmware does not allow you to use the router as a client to my wireless network.
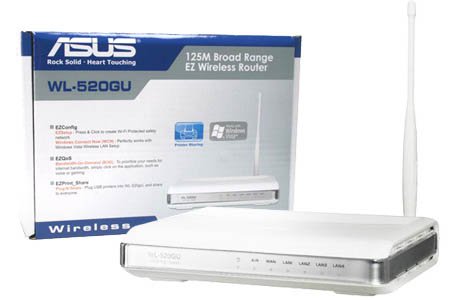
So Asus WL-520GU it is for Rs 2000 as it fulfills all our needs and is really cheap !!! :hap2:
View attachment 15998
Getting the router ready for OpenWRT:
1. Boot into linux on the PC (LiveCD will work well), typically Ubuntu. Connect the PC network cable to the lan port. Switch OFF the router.
2. Run the following commands (substitute the XX:XX with your router's MAC ID which is printed on the box):
ifconfig eth0 192.168.1.2 netmask 255.255.255.0
arp -s 192.168.1.1 xx:xx:xx:xx:xx:xx
3. Now run the tftp command and enter the commands under it one by one,
tftp 192.168.1.1
binary
rexmt 1
timeout 60
trace
put openwrt-brcm47xx-squashfs.trx
Wait three minutes and then hard reboot, then go to 192.168.1.1, use default user "root" and no password to get to the web interface. Set a default password for the user.
Now do a telnet 192.168.1.1 and login using user "root" and the password you just set.
Run the following commands in the telnet session:
opkg update
opkg install kmod-usb2 kmod-usb-core kmod-usb-storage kmod-usb-storage-extras block-hotplug block-mount hotplug2 kmod-usb-ohci kmod-usb-printer
All of them should succeed !!!
Configuring the OpenWRT router
Fire up a web browser and go to 192.168.1.1 for the web interface, move into Administration mode and fix the following:
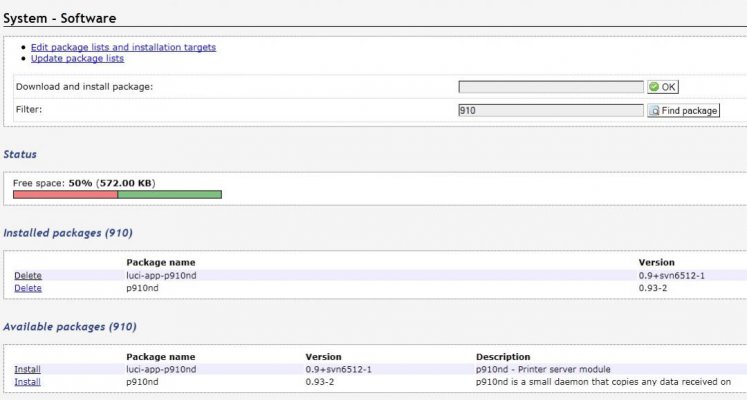
Step 1 : Go to Luci Overview page and add luci-app-p910nd and p910nd packages to the system
View attachment 15992
Reboot the router. When it comes up and you login to the web interface again, make sure you go to Services/Initscripts in the web and enable the p910 service and reboot again.
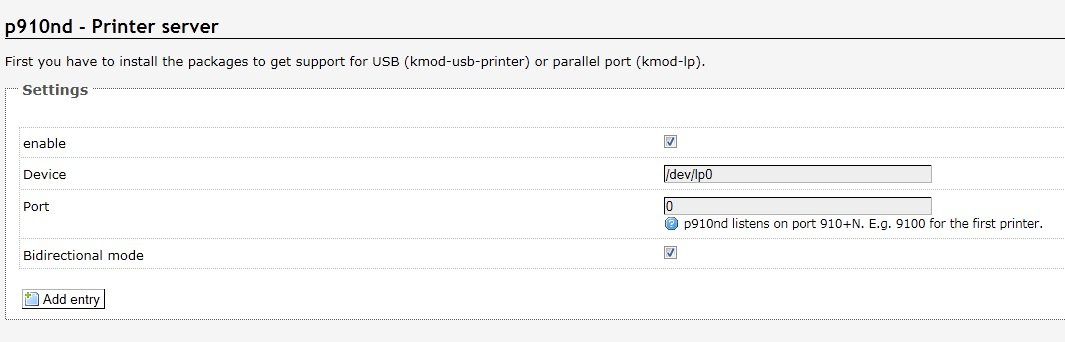
Step 2: You should be able to see the p910nd link in the services page. Enable it.
View attachment 15994
Step 3: Now is the tricky part, make the Router works as a wireless client for your existing network by changing the settings below to suit your existing network.
View attachment 15995
Note the fact that the network interface is set to a WAN instead of a LAN, so the router acts as a client to your wireless rather than becoming a access point itself.
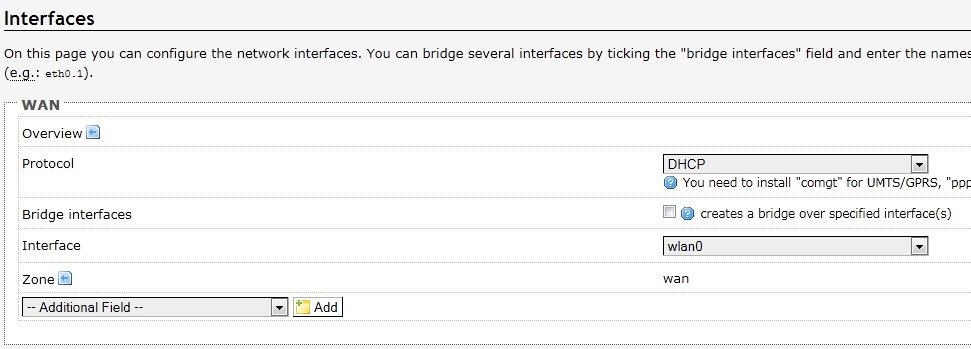
Step 4: Set your WAN screen in the following way :
View attachment 15997
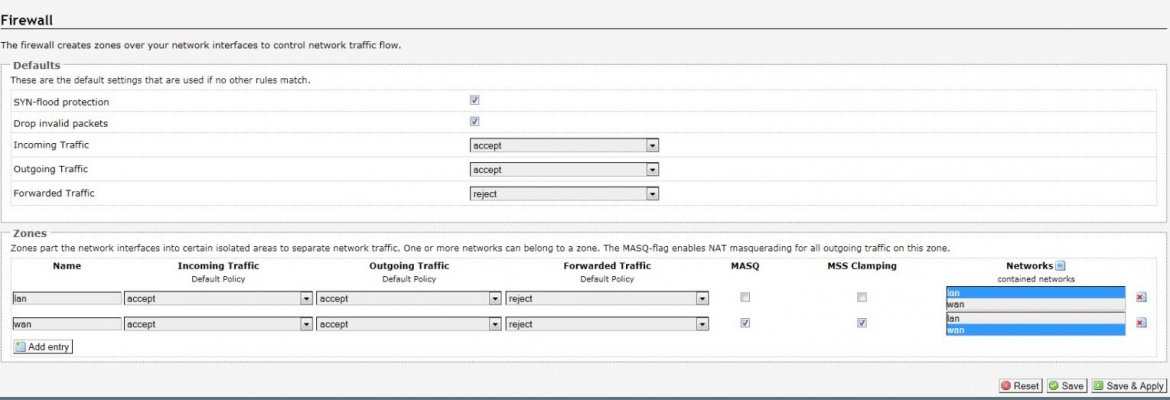
Step 5 : Now open up the firewall on the router to accept print requests from the WAN side:
[attachment=8569:15041.attach]
Save and apply all the changes above and after a few minutes, physically reboot (power off and then on) the machine.
The moment of truth : Switch off the router, take off the network cable connecting the computer to the router and boot it up. Configure your main network modem/wireless router to assign a static ip address to this router (so that you can always print to the same IP). Again reboot the router and wait till the wireless lights come up.
You should now be able to access the wireless router's web page from the computer again. Get to a telnet session for the IP that is assigned to the router :
Type "dmesg". You should see a boatload of stuff on the screen, ignore all ! Now connect the printer to the usb port on the router and switch on the printer. Wait a few seconds. Type "dmesg" again. You should see messages in the end saying the device saw and configured the USB printer.
usb 1-1: new full speed USB device using ohci_hcd and address 2
usb 1-1: configuration #1 chosen from 1 choice
usblp0: USB Bidirectional printer dev 2 if 0 alt 0 proto 2 vid 0x03F0 pid 0x1D04
Ensure that the p910d process is running using the command "ps -aef". The output should have:
/usr/sbin/p9100d -b -f /dev/lp0 0
That is it from the router side. Move the router to where the printer is at any corner of the house, connect everything and start it all up.
On the windows machine:
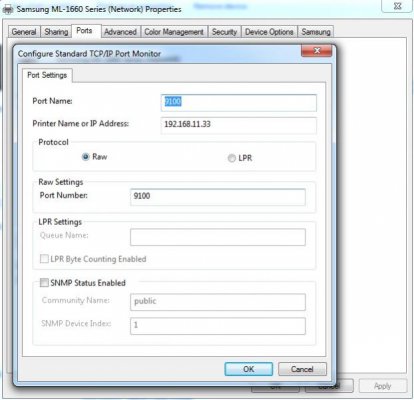
Add a new printer, choose Local Printer. Choose to create a new Standard TCP/IP Port. Set the IP address to the IP of the route, Protocol should be RAW, Port number 9100. Install the correct drivers for the printer in Windows (This is very important).
Make sure you create a new printer and not change a existing one.
View attachment 15996
Fire a test page and the page should print out of the wireless connected printer :clap:
Notes :
1. I have tested with Samsung Laser and HP inkjet printers, they seem to work well. But that is no surety that your existing printer will always work. Do a little reading to see if anyone has had success with your printer and OpenWRT/DD-wrt before you go this route.
2. All in one printers are a different ball game. I do not recommend them and I do not use them. So read up on your own if you want support for your scanner in the All-in-one. The printer by itself should work though.
3. Samsung and HP have released nice drivers and applications for Android that allows you to print anything from the Android phone or tablet. I just installed the Samsung application for Android, setup my network printer and can now print seamlessly from the tablet over the network. This makes it a complete solution.
From my blog at : Random musings...
One simple solution is to attach the printer to the home machine and share it on the network and have your laptops print to the network printer. I do not like the solution because every time you need to print anything from any place, you need to boot up he machine where the printer is attached.
So a wireless printer is the solution. A wireless inkjet printer itself is very expensive, the moment you need a wireless laser printer, the price complete goes insane. Made me think, there must be a simple way to get to share one printer across the network in such a way that I can place it anywhere and print from any machine. I personally have the Samsung ML-1666 Laser printer.
The tried and cheap Asus Routers with a USB port come to the rescue. Some of them allow you to share printers with a default firmware they ship with, but the default firmware does not allow you to use the router as a client to my wireless network.
So Asus WL-520GU it is for Rs 2000 as it fulfills all our needs and is really cheap !!! :hap2:
View attachment 15998
Getting the router ready for OpenWRT:
1. Boot into linux on the PC (LiveCD will work well), typically Ubuntu. Connect the PC network cable to the lan port. Switch OFF the router.
2. Run the following commands (substitute the XX:XX with your router's MAC ID which is printed on the box):
ifconfig eth0 192.168.1.2 netmask 255.255.255.0
arp -s 192.168.1.1 xx:xx:xx:xx:xx:xx
3. Now run the tftp command and enter the commands under it one by one,
tftp 192.168.1.1
binary
rexmt 1
timeout 60
trace
put openwrt-brcm47xx-squashfs.trx
Wait three minutes and then hard reboot, then go to 192.168.1.1, use default user "root" and no password to get to the web interface. Set a default password for the user.
Now do a telnet 192.168.1.1 and login using user "root" and the password you just set.
Run the following commands in the telnet session:
opkg update
opkg install kmod-usb2 kmod-usb-core kmod-usb-storage kmod-usb-storage-extras block-hotplug block-mount hotplug2 kmod-usb-ohci kmod-usb-printer
All of them should succeed !!!
Configuring the OpenWRT router
Fire up a web browser and go to 192.168.1.1 for the web interface, move into Administration mode and fix the following:
Step 1 : Go to Luci Overview page and add luci-app-p910nd and p910nd packages to the system
View attachment 15992
Reboot the router. When it comes up and you login to the web interface again, make sure you go to Services/Initscripts in the web and enable the p910 service and reboot again.
Step 2: You should be able to see the p910nd link in the services page. Enable it.
View attachment 15994
Step 3: Now is the tricky part, make the Router works as a wireless client for your existing network by changing the settings below to suit your existing network.
View attachment 15995
Note the fact that the network interface is set to a WAN instead of a LAN, so the router acts as a client to your wireless rather than becoming a access point itself.
Step 4: Set your WAN screen in the following way :
View attachment 15997
Step 5 : Now open up the firewall on the router to accept print requests from the WAN side:
[attachment=8569:15041.attach]
Save and apply all the changes above and after a few minutes, physically reboot (power off and then on) the machine.
The moment of truth : Switch off the router, take off the network cable connecting the computer to the router and boot it up. Configure your main network modem/wireless router to assign a static ip address to this router (so that you can always print to the same IP). Again reboot the router and wait till the wireless lights come up.
You should now be able to access the wireless router's web page from the computer again. Get to a telnet session for the IP that is assigned to the router :
Type "dmesg". You should see a boatload of stuff on the screen, ignore all ! Now connect the printer to the usb port on the router and switch on the printer. Wait a few seconds. Type "dmesg" again. You should see messages in the end saying the device saw and configured the USB printer.
usb 1-1: new full speed USB device using ohci_hcd and address 2
usb 1-1: configuration #1 chosen from 1 choice
usblp0: USB Bidirectional printer dev 2 if 0 alt 0 proto 2 vid 0x03F0 pid 0x1D04
Ensure that the p910d process is running using the command "ps -aef". The output should have:
/usr/sbin/p9100d -b -f /dev/lp0 0
That is it from the router side. Move the router to where the printer is at any corner of the house, connect everything and start it all up.
On the windows machine:
Add a new printer, choose Local Printer. Choose to create a new Standard TCP/IP Port. Set the IP address to the IP of the route, Protocol should be RAW, Port number 9100. Install the correct drivers for the printer in Windows (This is very important).
Make sure you create a new printer and not change a existing one.
View attachment 15996
Fire a test page and the page should print out of the wireless connected printer :clap:
Notes :
1. I have tested with Samsung Laser and HP inkjet printers, they seem to work well. But that is no surety that your existing printer will always work. Do a little reading to see if anyone has had success with your printer and OpenWRT/DD-wrt before you go this route.
2. All in one printers are a different ball game. I do not recommend them and I do not use them. So read up on your own if you want support for your scanner in the All-in-one. The printer by itself should work though.
3. Samsung and HP have released nice drivers and applications for Android that allows you to print anything from the Android phone or tablet. I just installed the Samsung application for Android, setup my network printer and can now print seamlessly from the tablet over the network. This makes it a complete solution.
From my blog at : Random musings...

 hyeah: