TUTORIAL UPDATED ACCORDING TO THE NEW 360 MULTIBUILDER Ver. 0.6
Required apps:-
360 Multi Builder v0.5:- http://rogero.tortuga-cove.com/360_Multi_Builder_v0.6.rar
Nandpro 2.0e:- Download from Xbins
Reset glitch Hack 1.1:- Download from Xbins
360 Flash dump tool 0.97:- http://dwl.xbox-scene.com/xbox360pc/nandtools/360_Flash_Tool_v0.97.rar
Required Hardware:-
A Nand Flasher(eg. Matrix nandflasher)
XC2C64A Programming Cable(LPT or USB)
XC2C64A Chip of your choice(eg. TX Coolrunner)
Good quality stranded or kynar wires of about 30awg
68nf capacitor for fat consoles(If your jasper is not giving good boot timing's)
270pf capacitor for Slim consoles in place of 220pf giving in the tutorial.
1) Update your console to the latest dash 2.0.13604.0
2) Dump the nand 64mb(for 256mb/512mb) jasper system & 16mb for Jasper, Falcon, Zephyr & trinity(Slim) atleast five times to be very sure, compare all the dumps with each other and choose the one which matches with no difference. eg: "nandpro usb: -r16 nand.bin" or "nandpro usb: -r64 nand.bin"
If you get any bad blocks than please remap it. Here is a bad block remapping video tutorial which will help you in remapping your bad block in case you have them in your nand(Flash the ecc file to boot xell and get the cpu key and then remap. Credits to sharktale1212 for pointing out this error in tut)
The above video tutorial is not made by me, So credit goes to the guy who made it
3) (This Step is for Jasper only)Open 360 flash dump 0.97 tool, browse to your nand and check your 2BL[CB] no. eg: 6750, Note: If you have 6751 or 6752 than your jasper is currently not exploitable via reset glitch hack as it has 2nd stage CB which needs more work to be able to glitch. So don't move forward if you have 6751 or 6752.
ImageShack® - Online Photo and Video Hosting
4) Create the ecc via cmd(procedure given in RGH Tutorial) and Copy the .ecc file to your nandpro folder, flash the ecc file to your nand via command: "nandpro usb: +w16 image_00000000.ecc" or "nandpro usb: +w64 image_00000000.ecc"
Now you can also create the .ecc file directly via 360_Multi_Builder_v0.6, just copy your original nand and paste it to "360_Multi_Builder_v0.6\Data\my360" and rename it to "nanddump.bin", now come back to the "360_Multi_Builder_v0.6" folder and execute "Run.exe" and follow the instructions and the end result will be you .ecc file which will be created inside "360_Multi_Builder_v0.6\Data"
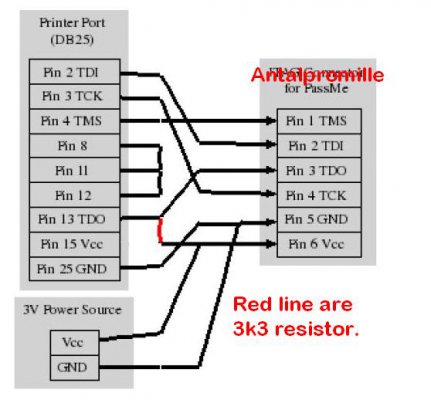
5) Prepare your LPT cable for Xilinx XC2C64A Chip programming, If you have bought your cable from some eshop than you can use that but if you want to prepare your own one than use the following diagram and prepare your own LPT programming cable for your work, for doing this you will require 1 X DB25(printer port) MALE & 1 X 3k3 Resistor.

6) Now do the RGH wiring with your xilinx xc2c64a chip of your choice(Xilinx xc2c64a chip first needs to be programmed with the appropriate ".jed" as per your console eg. "jasper.jed". Xilinx Chip programming instructions are given in the RGH Tutorial PDF), Now a lot of different makes of these chips are available in the market.(Wiring Instructions is given in the RGH 1.1 tutorial pdf). You should have good soldering skills to achieve RGH.
7) Turn on the console and the console should boot xell giving you your cpu key and dvd key. Copy your CPU key in a notepad and keep it safe.
8) Now download 360 Multi Builder v0.6 & extract it to your desktop.
9) Goto 360 Multi Builder v0.6\Data\my360 & paste your original nand here and change the name of your nand to nanddump.bin & make a txt file in the same place named "cpukey.txt" & inside the text file write your cpu key and save it.
ImageShack® - Online Photo and Video Hosting
10) Now go back to the ggbuild root folder and run "run.exe" file and follow the instructions and your ggbuild image will get created inside ggbuild\data folder named
"nandflash.bin"
11) Now copy the nandflash.bin file and paste it to your nandpro folder and flash the new ggbuild image i.e. "nandflash.bin" to your nand. eg: "nandpro usb: -w16 nandflash.bin" or "nandpro usb: -w64 nandflash.bin"
Please note:- Do not use +w here, if used your console will not start, beware
12) If all the above steps are performed perfectly your console should now boot into the new hacked dash where you can run all your homebrews.
Please Note:- I should not be held responsible for any harm done to your console, this procedure is performed by me on all fat hdmi consoles and it always worked perfectly for me.
Credits to GliGli and all who worked hard to bring out this fantastic hack. Thank you.
UPDATING YOUR JTAG/RGH DASHBOARD
1) Download the latest multibuilder, extract the multibuilder folder to your desktop.
2) Copy your original nand and "cpukey.txt" and paste it inside "360_Multi_Builder_0.6\Data\my360", and rename your original nand as "nanddump.bin"
3) Now come back to the "360_Multi_Builder_v0.6" folder and execute "Run.exe". Follow the instructions and it will automatically build your modified nand image.
4) You can now find your modified nand image inside "360_Multi_Builder_v0.6\Data" as "nandflash.bin".
5) Take any pendrive and format it on your pc with Fat32 file system, now copy the "nandflash.bin" & "xenon.elf" files from "360_Multi_Builder_v0.6\Data" to the root of your Fat32 formatted pendrive.
6) Connect your pendrive to any xbox 360 usb port and Start your console by pressing the EJECT button(Not by the power button)
7) Let your xbox take care of the rest of the automated procedure's that will happen now in "Xell Reloaded", don't interrupt while the flashing procedure is going on otherwise your xbox will not start from next time.
8) In the end, Xbox will tell you to shutdown the console. Now restart the console normally and you can enjoy your latest Dash on your (RGH)Jtag Xbox 360.
HOW TO GET YOUR AVATAR BACK AFTER JTAG/RGH DASHBOARD UPDATE
Download the official firmware update 2.0.14699.0 from http://download.microsoft.com/downl...1-AA5F-2D53A2A3B424/SystemUpdate_14699_CD.zip
Extract it on your desktop, rename the folder from $systemupdate to $$ystemupdate.
Copy $$ystemupdate to a Fat32 formatted flash drive(No need to copy the default.xex file with the folder as it will give you a temporary E71 error)
Now just plug the pen drive into your xbox 360 and turn your xbox on.
You will get a update prompt and select Yes to continue the update, after completion you will get your avatar's back.
Troubleshoot:- If you are not getting the update prompt after following the above steps then temporarily move your launch.ini from the root to some other folder such that it does not remain in the root of your hdd or mem unit and then follow the above steps again and you should get the update prompt.
HOW TO UPDATE TO THE LATEST DASHLAUNCH
Download the latest Dashlaunch(Current Latest is version 2.27).
Open dash_launch_v2.27.zip and extract all the files inside the zip inside a folder on your desktop.
Copy this folder to a Fat32 flash drive or hdd.
Now connect your hdd to your xbox 360 and start Xexmenu 1.1.
Browse to the Dashlauch folder that you had just copied onto your flash drive or hdd, inside the folder you will find a folder called "Installer" go inside it and run "default.xex" (eg. dash_launch_v2.27/Installer/default.xex).
Follow the onscreen instruction and now your Dashlauch will get updated. Enjoy")
Please Check below videos:
1) My Console Booting into Xell Reloaded
2) My Console booting GGbuild 0.33 & Freestyle Dash 2.0 RC2.1
Dinjo's Console Booting FSD 2.2 Hotfix with 14699 Dash, Dash Launch 2.27
Required apps:-
360 Multi Builder v0.5:- http://rogero.tortuga-cove.com/360_Multi_Builder_v0.6.rar
Nandpro 2.0e:- Download from Xbins
Reset glitch Hack 1.1:- Download from Xbins
360 Flash dump tool 0.97:- http://dwl.xbox-scene.com/xbox360pc/nandtools/360_Flash_Tool_v0.97.rar
Required Hardware:-
A Nand Flasher(eg. Matrix nandflasher)
XC2C64A Programming Cable(LPT or USB)
XC2C64A Chip of your choice(eg. TX Coolrunner)
Good quality stranded or kynar wires of about 30awg
68nf capacitor for fat consoles(If your jasper is not giving good boot timing's)
270pf capacitor for Slim consoles in place of 220pf giving in the tutorial.
1) Update your console to the latest dash 2.0.13604.0
2) Dump the nand 64mb(for 256mb/512mb) jasper system & 16mb for Jasper, Falcon, Zephyr & trinity(Slim) atleast five times to be very sure, compare all the dumps with each other and choose the one which matches with no difference. eg: "nandpro usb: -r16 nand.bin" or "nandpro usb: -r64 nand.bin"
If you get any bad blocks than please remap it. Here is a bad block remapping video tutorial which will help you in remapping your bad block in case you have them in your nand(Flash the ecc file to boot xell and get the cpu key and then remap. Credits to sharktale1212 for pointing out this error in tut)
The above video tutorial is not made by me, So credit goes to the guy who made it
3) (This Step is for Jasper only)Open 360 flash dump 0.97 tool, browse to your nand and check your 2BL[CB] no. eg: 6750, Note: If you have 6751 or 6752 than your jasper is currently not exploitable via reset glitch hack as it has 2nd stage CB which needs more work to be able to glitch. So don't move forward if you have 6751 or 6752.
ImageShack® - Online Photo and Video Hosting
4) Create the ecc via cmd(procedure given in RGH Tutorial) and Copy the .ecc file to your nandpro folder, flash the ecc file to your nand via command: "nandpro usb: +w16 image_00000000.ecc" or "nandpro usb: +w64 image_00000000.ecc"
Now you can also create the .ecc file directly via 360_Multi_Builder_v0.6, just copy your original nand and paste it to "360_Multi_Builder_v0.6\Data\my360" and rename it to "nanddump.bin", now come back to the "360_Multi_Builder_v0.6" folder and execute "Run.exe" and follow the instructions and the end result will be you .ecc file which will be created inside "360_Multi_Builder_v0.6\Data"
5) Prepare your LPT cable for Xilinx XC2C64A Chip programming, If you have bought your cable from some eshop than you can use that but if you want to prepare your own one than use the following diagram and prepare your own LPT programming cable for your work, for doing this you will require 1 X DB25(printer port) MALE & 1 X 3k3 Resistor.

6) Now do the RGH wiring with your xilinx xc2c64a chip of your choice(Xilinx xc2c64a chip first needs to be programmed with the appropriate ".jed" as per your console eg. "jasper.jed". Xilinx Chip programming instructions are given in the RGH Tutorial PDF), Now a lot of different makes of these chips are available in the market.(Wiring Instructions is given in the RGH 1.1 tutorial pdf). You should have good soldering skills to achieve RGH.
7) Turn on the console and the console should boot xell giving you your cpu key and dvd key. Copy your CPU key in a notepad and keep it safe.
8) Now download 360 Multi Builder v0.6 & extract it to your desktop.
9) Goto 360 Multi Builder v0.6\Data\my360 & paste your original nand here and change the name of your nand to nanddump.bin & make a txt file in the same place named "cpukey.txt" & inside the text file write your cpu key and save it.
ImageShack® - Online Photo and Video Hosting
10) Now go back to the ggbuild root folder and run "run.exe" file and follow the instructions and your ggbuild image will get created inside ggbuild\data folder named
"nandflash.bin"
11) Now copy the nandflash.bin file and paste it to your nandpro folder and flash the new ggbuild image i.e. "nandflash.bin" to your nand. eg: "nandpro usb: -w16 nandflash.bin" or "nandpro usb: -w64 nandflash.bin"
Please note:- Do not use +w here, if used your console will not start, beware
12) If all the above steps are performed perfectly your console should now boot into the new hacked dash where you can run all your homebrews.
Please Note:- I should not be held responsible for any harm done to your console, this procedure is performed by me on all fat hdmi consoles and it always worked perfectly for me.
Credits to GliGli and all who worked hard to bring out this fantastic hack. Thank you.
UPDATING YOUR JTAG/RGH DASHBOARD
1) Download the latest multibuilder, extract the multibuilder folder to your desktop.
2) Copy your original nand and "cpukey.txt" and paste it inside "360_Multi_Builder_0.6\Data\my360", and rename your original nand as "nanddump.bin"
3) Now come back to the "360_Multi_Builder_v0.6" folder and execute "Run.exe". Follow the instructions and it will automatically build your modified nand image.
4) You can now find your modified nand image inside "360_Multi_Builder_v0.6\Data" as "nandflash.bin".
5) Take any pendrive and format it on your pc with Fat32 file system, now copy the "nandflash.bin" & "xenon.elf" files from "360_Multi_Builder_v0.6\Data" to the root of your Fat32 formatted pendrive.
6) Connect your pendrive to any xbox 360 usb port and Start your console by pressing the EJECT button(Not by the power button)
7) Let your xbox take care of the rest of the automated procedure's that will happen now in "Xell Reloaded", don't interrupt while the flashing procedure is going on otherwise your xbox will not start from next time.
8) In the end, Xbox will tell you to shutdown the console. Now restart the console normally and you can enjoy your latest Dash on your (RGH)Jtag Xbox 360.
HOW TO GET YOUR AVATAR BACK AFTER JTAG/RGH DASHBOARD UPDATE
Download the official firmware update 2.0.14699.0 from http://download.microsoft.com/downl...1-AA5F-2D53A2A3B424/SystemUpdate_14699_CD.zip
Extract it on your desktop, rename the folder from $systemupdate to $$ystemupdate.
Copy $$ystemupdate to a Fat32 formatted flash drive(No need to copy the default.xex file with the folder as it will give you a temporary E71 error)
Now just plug the pen drive into your xbox 360 and turn your xbox on.
You will get a update prompt and select Yes to continue the update, after completion you will get your avatar's back.
Troubleshoot:- If you are not getting the update prompt after following the above steps then temporarily move your launch.ini from the root to some other folder such that it does not remain in the root of your hdd or mem unit and then follow the above steps again and you should get the update prompt.
HOW TO UPDATE TO THE LATEST DASHLAUNCH
Download the latest Dashlaunch(Current Latest is version 2.27).
Open dash_launch_v2.27.zip and extract all the files inside the zip inside a folder on your desktop.
Copy this folder to a Fat32 flash drive or hdd.
Now connect your hdd to your xbox 360 and start Xexmenu 1.1.
Browse to the Dashlauch folder that you had just copied onto your flash drive or hdd, inside the folder you will find a folder called "Installer" go inside it and run "default.xex" (eg. dash_launch_v2.27/Installer/default.xex).
Follow the onscreen instruction and now your Dashlauch will get updated. Enjoy
Please Check below videos:
1) My Console Booting into Xell Reloaded
2) My Console booting GGbuild 0.33 & Freestyle Dash 2.0 RC2.1
Dinjo's Console Booting FSD 2.2 Hotfix with 14699 Dash, Dash Launch 2.27