
arunmcops
Discoverer
Since I have been using Raspberry Pi for converting my USB MFD Inktank 310 Series as a Network Printer and Network Scanner with the help of these guides here and here. Same Pi can also be used for setting up network wide ad blocker.
This guide is about setting up PiHole on home network.
Log in to your raspberry pi and run this command in terminal:
1. The Pi-hole installer should begin. You will have to use a similar console style navigation of tabs, arrow keys and enter/space bar to navigate the options. If you get stuck at any point, pick the default.

2. Pi-hole needs a static IP to function properly so assign a static IP Address. If your device has more than one network interface, you will be prompted to pick an interface. We are using the wired interface, this should be named enxxx or eth0. Ethernet is recommended here for reliability.


3. Next, you will be asked to pick a DNS provider.

4.Enable 3rd party blocklists.

5. Leave Protocols as default.

6. Confirm the static IP configuration.

7. Confirm web interface.

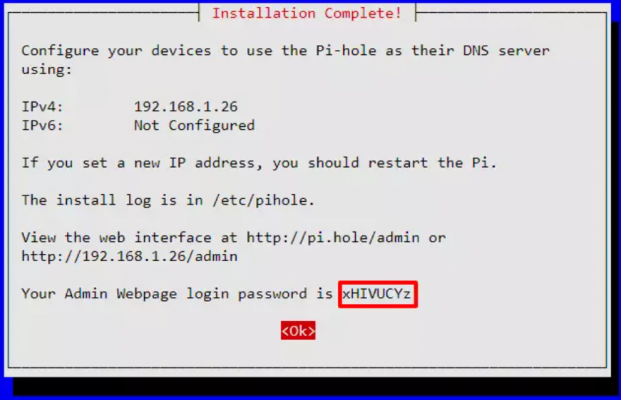
8. Finally, you will be presented with a screen saying that the installation is complete. Please note down the password displayed on this screen because this will be the password that we will use to login to the web dashboard.

Step 1
Login to your router by entering the default username and the password provided by the router manufacturer.
Normally the default ip address for a router is 192.168.1.1 , but it will vary sometimes. Check the router specifications to obtain the IP.
Step 2
Locate the DHCP Server Configuration page and add the IP address of the Raspberry Pi as the primary DNS Server.

Step 3
Then set Secondary DNS Server as 1.1.1.1. This is for the Cloudflare DNS
Step 4
Apply your changes
Now Pi-hole is running on your entire network!
Let’s move on to viewing our network statistics from the browser
Step 1
Open your favorite browser and type the IP address of the Raspberry Pi followed by “/admin” in the search bar.

Step 2
Enter the password generated by the Pi-hole setup before and log in.
Step 3
Now you can see which ads are being blocked and various other features in this dashboard. You can also blacklist certain websites so that you can control which websites to allow through your network.

Any suggestion in the guide are welcome. If someone can suggest any other uses of raspberry Pi, I would like to implement it in my Home Network and post a guide accordingly.
.
This guide is about setting up PiHole on home network.
Log in to your raspberry pi and run this command in terminal:
Code:
curl -sSL https://install.pi-hole.net | bash2. Pi-hole needs a static IP to function properly so assign a static IP Address. If your device has more than one network interface, you will be prompted to pick an interface. We are using the wired interface, this should be named enxxx or eth0. Ethernet is recommended here for reliability.
3. Next, you will be asked to pick a DNS provider.
4.Enable 3rd party blocklists.
5. Leave Protocols as default.
6. Confirm the static IP configuration.
7. Confirm web interface.
8. Finally, you will be presented with a screen saying that the installation is complete. Please note down the password displayed on this screen because this will be the password that we will use to login to the web dashboard.
Configuring network-wide ad-blocker settings :
Now that you have enabled Pi-hole on the Raspberry Pi, let’s go ahead and enable this throughout the entire home network.Step 1
Login to your router by entering the default username and the password provided by the router manufacturer.
Normally the default ip address for a router is 192.168.1.1 , but it will vary sometimes. Check the router specifications to obtain the IP.
Step 2
Locate the DHCP Server Configuration page and add the IP address of the Raspberry Pi as the primary DNS Server.
Step 3
Then set Secondary DNS Server as 1.1.1.1. This is for the Cloudflare DNS
Step 4
Apply your changes
Pi-Hole Dashboard
Now Pi-hole is running on your entire network!
Let’s move on to viewing our network statistics from the browser
Step 1
Open your favorite browser and type the IP address of the Raspberry Pi followed by “/admin” in the search bar.
Step 2
Enter the password generated by the Pi-hole setup before and log in.
Step 3
Now you can see which ads are being blocked and various other features in this dashboard. You can also blacklist certain websites so that you can control which websites to allow through your network.
Any suggestion in the guide are welcome. If someone can suggest any other uses of raspberry Pi, I would like to implement it in my Home Network and post a guide accordingly.
.


 or both have power backup!
