User Guides [GUIDE] Rooting and Unlocking your Samsung Galaxy Nexus(Nexus Prime)

01_gallery.png

Hi guys,
I got my brand new Galaxy Nexus on 27th May'12 and rooted/unlocked it within 2-3 hrs of usage
This is just a small guide from me regarding rooting your Samsung Galaxy Nexus(GNex) and unlocking its bootloader
Lets start off with some basic fundamentals on rooting and the bootloader

What is rooting ?
Most of us here don't really know what "ROOTING" really means its become a tradition for most android users,get a new phone and root it but what the hell does is really mean ?
Its not like your gonna dig a hole in the ground and plant small trees for a "Go Green" initiative :p

Jokes apart,Rooting gives for "ADMIN" rights on your phone,Since android is a linux based OS,rooting will give you more access over your android OS and apps that take advantage of the root permissions.
So basically it gives you "SUPERUSER" rights on your phone and your can makes changes to your phone which include but is not limited to uninstalling pre-installed apps that come along with your phone,most of those are useless so untill you root your phone it won't be possible to remove them plus it gives you permissions on installing custom roms and recoveries which won't be possible on stock.

What is a bootloader and why unlock it?
Bootloader in simple terms means a code that is executed before any Operating System starts to run and in an android phone every manufacturer has its own version of bootloader depending on its motherboard,so its basically like a BIOS for your PC
The bootloader is locked by the manufacturers because they want you to stick to their Android OS version specifically designed for the device with those special "UI's"
So before you decide on flashing a custom rom its better to get your bootloader unlocked

Rooting and Unlocking process :
1. Download the GNex TOOLKIT V7.0 and install it from here -
Code:
http://www.mediafire.com/?fawgj0qpriw391m
NOTE : Make sure you have the Galaxy Nexus USB drivers installed first,Connect your nexus to PC/Laptop and Goto device manager and check under Android Phone
It should show something such as Samsung Galaxy Nexus ADB Interface,if not install them first from the above mentioned toolkit

Once installed,this is how the interface for the toolkit looks like(I have an older version 6.2) :
2yv1eh5.jpg


n8676.jpg


2. Choose the proper version of ICS on your phone,I had Android 4.0.2 by default which i then upgraded to 4.0.4(Built no. IMM76I for the GSM version)
3. Option 7 is the "1 click for all" install which is the same for every built listed in the tool,so select that while keeping the Gnex connected to your PC via USB
4. Go to the restroom and have a nice relaxing act of pouring your yellow fluid down the hole(PEE) :p
5. When you get back you will have a rooted phone + a Unlocked Bootloader + Clockwork Mod recovery(custom recovery) installed on your GNex
6. Now you are good to go to flash a kernel of your choice or install a custom rom

P.S - During the steps if you are wondering,what is "FASTBOOT" then this is how it looks on your GNex -
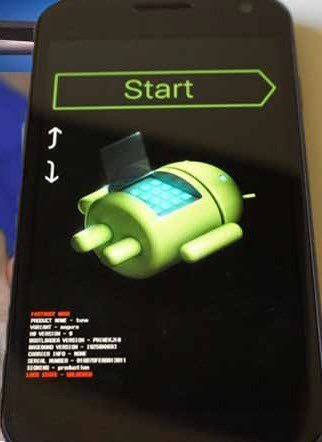
GalaxyNexusFastboot_Bootloader_Mode.jpg

ROFL !! you don't believe it do you ??Its just simple as that...VOILA
Honsetly,I didn't want to ruin the original stock OS look from google so i still haven't installed any custom roms on my phone
But i have tested a couple of kernels on my GNex which are given below

The kernel installation is just optional so please ignore it if don't wish to flash it
1. GLaDOS kernel -
Code:
http://goo.im/devs/aperture/GLaDOS-GalaxyNexus
You can get the control app for the kernel from here :
Code:
https://play.google.com/store/apps/details?id=aperture.ezekeel.gladoscontrol

2. Franco Kernel -
Code:
http://minooch.com/franciscofranco/Galaxy%20Nexus/nightlies/
You can get the control app for the kernel from here :
Code:
https://play.google.com/store/apps/details?id=com.franco.kernel

Kernel Installation Steps :
1. Once you have downloaded the kernel,copy the .zip file onto your phone's memory
2. Power off ur GNex
3. Press Power + Both the volume buttons simultaneously and hold them down
4. Now you are in the "Fastboot" where you can see "START" written in big letters and a stupid android bot....At the bottom of the screen it will tell you that the bootloader is unlocked
5. Press the Volume down key key to select "Recovery Mode" and then press the power button to enter the clockwork mod custom recovery,Most Amazing part of the custom recovery is that its fully touch compatible,just awesome
6. Select "Install zip from sd card" and choosing your specific kernel zip and it will start flashing it and then just reboot
7. Install the specific control apps for better customization of your phone

And your finally good to go with your newely rooted and unlocked Galaxy Nexus
Hope someone finds this guide useful and please don't pay attention to spelling errors :bleh:

 
Yea,I understand that but when you can access the root directory from the phone itself why bother using a windows program ;)
I used it to modify build.prop, which is much easier using a text editor on Windows.

BTW, it's strange but even after rooting my apps and files are still there.

- - - Updated - - -

Jelly Bean goodness is here. :hail: Project Butter makes it so fast. :O

screenshot2012082616370.png
 
@kvikram ,congrats on getting the project butter
Unlocking the bootloader does erase the data but rooting ideally doesn't ;)
 
Last edited by a moderator:
What a joy this phone is to use! I am thoroughly enjoying it! It's such an awesome upgrade from my laggy Defy. Even for daily tasks like phone calls and SMS, it is really awesome to have such fluidity in the UI. I don't think there is anything more you need from a smartphone.
 
What a joy this phone is to use! I am thoroughly enjoying it! It's such an awesome upgrade from my laggy Defy. Even for daily tasks like phone calls and SMS, it is really awesome to have such fluidity in the UI. I don't think there is anything more you need from a smartphone.

Hahahah,Very true my friend ;)
 
Wonderful...
btw,why do you use Droid Explorer ?? Try ES File Explorer,i find it pretty simple with all the necessary features ;)
True. I am using ES File Explorer to play movies on my phone shared over Wi-Fi. Thats one awesome feature.

@kvikram ,congrats on getting the project butter
Unlocking the bootloader does erase the data but rooting ideally doesn't ;)
I am a bit confused yet again. I plan to take a Nandroid backup. So I shall proceed with rooting the device, right? Will I also have to unlock the bootloader first then? Wouldn't that wipe out the entire data anyhow?
 
Last edited by a moderator:
I am a bit confused yet again. I plan to take a Nandroid backup. So I shall proceed with rooting the device, right? Will I also have to unlock the bootloader first then? Wouldn't that wipe out the entire data anyhow?

Ok,there is some simplified steps
1. You will only be able to take a Nandroid backup if you have CWM Recovery installed which probably requires your phone to be rooted
2. No Root,No CWM Recovery,Bootloader not unlocked then better manually copy-paste your Music,Pictures and other important folders into your PC
3. Sync your contact's with Google so that when you re-enter your Google ID you will get your contacts back
4. Use "SMS Backup and Restore" for your SMS and make sure you copy the .xml file generated onto your PC for restoring them later
5. Won't be able to use "Titanium Backup" if phone is not rooted
6. As far as i know,Unlocking the Bootloader erases your data not rooting(Not sure,can't remember)
7. When everything is done,just copy all the files back to your phone storage and you won't loose anything except the apps need to be downloaded again from Play store

1. Should've unlocked and rooted the phone as soon as it landed in my hands.
2. That is the only option left indeed.
3. Already synced captain.
4. Will do that pronto.
5. Emphasizing upon point 1 again.
6. Unlocking erases. True. Not rooting.
7. As of today I have alot of apps. I hope I do not lose any data associated with it.

I will have to root someday or the other. Better if i get on it asap. I want more battery backup also.
Also, with this toolkit, do I automatically get upgraded to JB 4.1.1 or I have to perform the steps to flash a ROM? I have downloaded the toolkit and also the factory image of JB throught the kit. I am guessing it wasn't required. I plan to first test this stock JB ROM. Then CM9 and then Liquid Smooth. AOKP has a gay-ish symbol which is the only point stopping me :p NOM.

It doesn't really matter if you have downloaded the JB image from Google,just paste the image file in your Toolkit installation directory (There is a folder called "put_google_factory_image_here") and just follow the screen instructions to flash stock JB
CM9 is ICS so you can't flash it on stock JB,you have to download to ICS first :p (Use CM10 instead)
Liquid Smooth Beta 2(JB),Paranoid Android(PA),AndroidME,XenonHD are some of the best ROM's out there for JB
And yea,AOKP's unicorn rule's(Just the Unicorn,not the ROM)....i'll beat you till death if you stay another word(The pink color is GAY though) :p

Ok then change of plans.
I wish to go for CM9 then Liquid Smooth for ICS and then to the JB roms.
So as of now I just want to unlock and root and continue to use my phone on the stock 4.0.4. This toolkit description mentions "jelly bean edition". Does that mean if i select the do it all option (7 or 8 i think) will I be upgraded to JB or it will just unlock->root->cwm my phone and leave the ICS 4.0.4 untouched?

And you like the Unicorn huh? Pink Unicorn is ofcourse a bit overdoing it. Of course I did NOM it :p :D

If you don't wanna upgrade to JB then just for option 8,get a popcorn can and enjoy the show(Make sure phon'e connected with all drivers installed :p)
The toolkit with root and unlock the bootloader for you,it will NOT install JB unless you select the respective option

P.S - Unicorn's are sexy,Just like Dragons :sleep:
 
Stock JB is so awesome, I don't feel any need to use a custom ROM for now. :)

At any time, if I want to undo all things root (don't know why I would do that :p), all I have to do is flash a factory image, right? That is, it's the equivalent of flashing an SBF file on the Defy?

By the way, using SA labs equalizer on the play store is a great solution to fix the awful loudspeaker volume on the phone. :) I set all bands at 7dB, bass boost at 30% and virtualizer at 20%%.

P.S. @seraph I see you are a fan of Death Note. :p :D
 
Last edited by a moderator:
Stock JB is so awesome, I don't feel any need to use a custom ROM for now. :)

At any time, if I want to undo all things root (don't know why I would do that :p), all I have to do is flash a factory image, right? That is, it's the equivalent of flashing an SBF file on the Defy?

By the way, using SA labs equalizer on the play store is a great solution to fix the awful loudspeaker volume on the phone. :) I set all bands at 7dB, bass boost at 30% and virtualizer at 20%%.

P.S. @seraph I see you are a fan of Death Note. :p :D
Even I would stick to stock before moving on to different ROMs to "know where I came from" :p
Awful volume would be - is it too low or high? Low right?

And yes, a Death Note fan lies here. I had even ordered the first 2 volumes of the Manga. The followed it up with the animated series which is one of the best I have ever seen.
 
Last edited by a moderator:
@seraph

- In simple terms,a kernel is something that helps your hardware go hand - in - hand with your software and applications,flashing a kernel other than the stock will improve the performance of your device as there are various kernel's out there for our GNex that improves that hand - in -hand co-ordination between the hardware and software
- A kernel can be flashed at any point of time on a ROM,there is no fixed procedure or any subsequent steps for flashing it(You need ClockWork Mod Recovery for flashing any files on the GNex which is installed during the whole Rooting/Unlocking procedure)

I am still a bit unsure about flashing the kernel. When would I want to flash a kernel? Which kernels are known and most importantly if they're stable or not. You've mentioned the Franco and Glados kernel. Have you flashed those onto your phone? What improvements they bring in? As of now I am going for CM9 soon. Would I want to flash my kernel after that? I am guessing CM9 comes with its own flashed kernel so I shouldn't fiddle around that area at all. Still out of curiosity I ask.
 
Last edited by a moderator:
I am still a bit unsure about flashing the kernel. When would I want to flash a kernel? Which kernels are known and most importantly if they're stable or not. You've mentioned the Franco and Glados kernel. Have you flashed those onto your phone? What improvements they bring in? As of now I am going for CM9 soon. Would I want to flash my kernel after that? I am guessing CM9 comes with its own flashed kernel so I shouldn't fiddle around that area at all. Still out of curiosity I ask.

The kernel part is just optional and totally depends on you
Now,the advantages of flashing a kernel on stock ROM's would be better battery(in some instances) improved/extended features which let you overclock and other goodies
Basically,custom kernel's try giving you a better experience when it comes to usability then your stock kernels

I have mentioned just 2 kernel's here but i have flashed Franco's kernel,Glados Kernel and Trinity Kernel
CM9 has their own kernel version,so no need to flash any custom one's
There are even custom ROM's built out there which actually come preloaded with some of the famous kernel's like Franco Kernel

I'm currently on Stock Jellybean with Franco's Kernel ;)
 
Now running 4.1.1 :)

All the data(installed apps, music etc) was wiped clean but but but only when I proceeded to upgrade to JB. Before that, when I just unlocked+rooted using the 1-Click for all button, the date remained intact. Now I am re installing the apps from the play store. Somehow, this was not the first step in the plan. I wanted to go for CM9 and other ICS ROMs before proceeding to JB.

1)The question is how to install CM9 on this then? ( CM10 is still under developments and I want something stable ) That is, I want to go back to ICS and proceed sequentially.
2) I have no clue if the device is rooted and I need to root it again now. How to check that?
3) I can safely flash the Kernel right? I am at a point where I can go any way - forward or backward as all the data is wiped clean :p

Thanks :)

------ Updated ------

Never mind. I don't wanna go back.

- For CM9 you will need to go back to ICS with the help of the factory image
- There are multiple way to check your root status,you must have an app known as "Superuser" installed,install terminal emulator and check for "SU" status(#)
- Kernel can be flashed at any time
 
- For CM9 you will need to go back to ICS with the help of the factory image
- There are multiple way to check your root status,you must have an app known as "Superuser" installed,install terminal emulator and check for "SU" status(#)
- Kernel can be flashed at any time

Will download the stock ICS tonight. I understood. Will have to go back to stock then cm9. Finally everything is making sense now :D
Yeah it wasn't rooted as you said. I lost my root after upgrading. Rooted it again using the kit.
I am looking for a kernel. Kindly suggest. Most basic and stable one with good battery life. I heard the contrast and display gets a little manipulated after flashing a kernel? Most of the people keep asking the RGB or something. So guessed it. Is it true?

- You can either consider using Trinity or Franco's kernel
- I'm currently on Franco's kernel
- Yes,the color settings will change once you install the kernel but you can easily control the settings from the control app for that particular kernel available in the play store
 
Back
Top