Guide [GUIDE] Rooting and Unlocking your Samsung Galaxy Nexus(Nexus Prime)

Status
Not open for further replies.
01_gallery.png

Hi guys,
I got my brand new Galaxy Nexus on 27th May'12 and rooted/unlocked it within 2-3 hrs of usage
This is just a small guide from me regarding rooting your Samsung Galaxy Nexus(GNex) and unlocking its bootloader
Lets start off with some basic fundamentals on rooting and the bootloader

What is rooting ?
Most of us here don't really know what "ROOTING" really means its become a tradition for most android users,get a new phone and root it but what the hell does is really mean ?
Its not like your gonna dig a hole in the ground and plant small trees for a "Go Green" initiative :p

Jokes apart,Rooting gives for "ADMIN" rights on your phone,Since android is a linux based OS,rooting will give you more access over your android OS and apps that take advantage of the root permissions.
So basically it gives you "SUPERUSER" rights on your phone and your can makes changes to your phone which include but is not limited to uninstalling pre-installed apps that come along with your phone,most of those are useless so untill you root your phone it won't be possible to remove them plus it gives you permissions on installing custom roms and recoveries which won't be possible on stock.

What is a bootloader and why unlock it?
Bootloader in simple terms means a code that is executed before any Operating System starts to run and in an android phone every manufacturer has its own version of bootloader depending on its motherboard,so its basically like a BIOS for your PC
The bootloader is locked by the manufacturers because they want you to stick to their Android OS version specifically designed for the device with those special "UI's"
So before you decide on flashing a custom rom its better to get your bootloader unlocked

Rooting and Unlocking process :
1. Download the GNex TOOLKIT V7.0 and install it from here -
Code:
http://www.mediafire.com/?fawgj0qpriw391m
NOTE : Make sure you have the Galaxy Nexus USB drivers installed first,Connect your nexus to PC/Laptop and Goto device manager and check under Android Phone
It should show something such as Samsung Galaxy Nexus ADB Interface,if not install them first from the above mentioned toolkit

Once installed,this is how the interface for the toolkit looks like(I have an older version 6.2) :
2yv1eh5.jpg


n8676.jpg


2. Choose the proper version of ICS on your phone,I had Android 4.0.2 by default which i then upgraded to 4.0.4(Built no. IMM76I for the GSM version)
3. Option 7 is the "1 click for all" install which is the same for every built listed in the tool,so select that while keeping the Gnex connected to your PC via USB
4. Go to the restroom and have a nice relaxing act of pouring your yellow fluid down the hole(PEE) :p
5. When you get back you will have a rooted phone + a Unlocked Bootloader + Clockwork Mod recovery(custom recovery) installed on your GNex
6. Now you are good to go to flash a kernel of your choice or install a custom rom

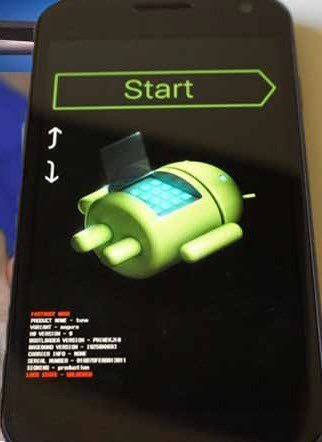
P.S - During the steps if you are wondering,what is "FASTBOOT" then this is how it looks on your GNex -
GalaxyNexusFastboot_Bootloader_Mode.jpg

ROFL !! you don't believe it do you ??Its just simple as that...VOILA
Honsetly,I didn't want to ruin the original stock OS look from google so i still haven't installed any custom roms on my phone
But i have tested a couple of kernels on my GNex which are given below

The kernel installation is just optional so please ignore it if don't wish to flash it
1. GLaDOS kernel -
Code:
http://goo.im/devs/aperture/GLaDOS-GalaxyNexus
You can get the control app for the kernel from here :
Code:
https://play.google.com/store/apps/details?id=aperture.ezekeel.gladoscontrol

2. Franco Kernel -
Code:
http://minooch.com/franciscofranco/Galaxy%20Nexus/nightlies/
You can get the control app for the kernel from here :
Code:
https://play.google.com/store/apps/details?id=com.franco.kernel

Kernel Installation Steps :
1. Once you have downloaded the kernel,copy the .zip file onto your phone's memory
2. Power off ur GNex
3. Press Power + Both the volume buttons simultaneously and hold them down
4. Now you are in the "Fastboot" where you can see "START" written in big letters and a stupid android bot....At the bottom of the screen it will tell you that the bootloader is unlocked
5. Press the Volume down key key to select "Recovery Mode" and then press the power button to enter the clockwork mod custom recovery,Most Amazing part of the custom recovery is that its fully touch compatible,just awesome
6. Select "Install zip from sd card" and choosing your specific kernel zip and it will start flashing it and then just reboot
7. Install the specific control apps for better customization of your phone

And your finally good to go with your newely rooted and unlocked Galaxy Nexus
Hope someone finds this guide useful and please don't pay attention to spelling errors :bleh:

 
Sorry about bumping an old thread.
I recently bought the Galaxy Nexus and its running the stock ICS 4.0.4. Kernel is the IMM761 one.

I have literally no experience in rooting and have some burning questions -
1) I need to create backup I understand after much reading as rooting erases all data right?
2) on xda there are so many ways to root I got confused. Which one to go for?
3) Rooting is the subsequent step of Unlocking the bootloader?
4) What will flashing the kernel achieve and when should I do that and how is it different from rooting?
@seraph
- First of all,welcome to the GNex club buddy !!
- Rooting doesn't delete your data its the bootloader unlocking that will wipe your data out,best way to backup your apps will be to use "Titanium Backup" from the Play Store
- One of the best ways to root your device and unlocking the bootloader is mentioned in this thread,you just have to press some numbers on the keypad(Follow the Options) and the GNex Toolkit will do everything for you
- Rooting and Unlocking the Bootloader are completely different things,but in this case YES,its a subsequent step (First Unlock and then Root)
- In simple terms,a kernel is something that helps your hardware go hand - in - hand with your software and applications,flashing a kernel other than the stock will improve the performance of your device as there are various kernel's out there for our GNex that improves that hand - in -hand co-ordination between the hardware and software
- A kernel can be flashed at any point of time on a ROM,there is no fixed procedure or any subsequent steps for flashing it(You need ClockWork Mod Recovery for flashing any files on the GNex which is installed during the whole Rooting/Unlocking procedure)
- Rooting is just giving your phone "SuperUser" rights to acess the core files on the Android System/OS just like in Linux so Kernel flashing and rooting are completely different things

Hope,this helps mate...Anymore queries feel free to ask out !!

Just joined the Nexus club! Boy is it awesome or what?! :D

YashBhatt
Please do a noob's tutorial on how to update the phone to Jelly Bean. If I go to the settings page -> about phone -> system updates it simply says that it's up to date, even though I'm still on 4.0.4

Please also suggest a screen guard. Should I simply get one of the unbranded ones from ebay? NEW SAMSUNG GALAXY NEXUS 3 I9250 MATTE SCREEN GUARD SCRATCH PROTECTOR ANTI GLARE | eBay
@kvikram
Welcome aboard to the GNex club buddy
If you are not getting the OTA update then better get the GNex toolkit and flash the 4.1.1 factory image available from Google,simple and the fastest way to get JB
And yes,I will do a tutorial if you are having problems with flashing JB from the factory image

I'm currently using a unbranded Scratch Guard as well,3 months back when i got my GNex there were no scratch guards available in the local market so had to use a unbranded one
But,check locally if you can get scratch guards from "RAINBOW" They are pretty reliable and cheap,using one on my playbook and its good....maybe even Ebay will have that scratch guard
 
Last edited by a moderator:
Please also suggest a screen guard. Should I simply get one of the unbranded ones from ebay? NEW SAMSUNG GALAXY NEXUS 3 I9250 MATTE SCREEN GUARD SCRATCH PROTECTOR ANTI GLARE | eBay

There are great screen guards available out there. Try infibeam also. They have something called "ScreenGard" for the Galaxy Nexus I9250. If you're reading other threads then you'd know I went for the Gadgetshieldz one which is good. The one that you've mentioned has a matte finish. I think you should see what matte finish looks like before buying that.
 
YashBhatt Thanks buddy! I found the screen guard you mentioned : Rainbow Screen Protector - Samsung Galaxy Nexus i9250 | eBay

This isn't a matte finish right? Need one that looks "invisible".

seraph Thanks for the suggestions. I'm looking at one of the Gadgetshieldz one on eBay : Ultra-Thin Skins for Samsung Galaxy Nexus | eBay. The installation seems to be really hard. :O How did it go for you?
@kvikram
That's "Optical Clear"
You can use that scratch guard and it does give you good visiblity......
 
Last edited by a moderator:
According to your built version,you won't receive the OTA update
Now,did you download the latest GNex Toolkit from XDA ??If not,do that FIRST !!

Once you have the GNex Toolkit installed and running
- When it tells you to select the model,choose IMM76I (GSM -Yakju) instead of selecting IMM76K(Verzion Model)
- It will give you a long list of options to select from,Just use Option 8 which is for Downloading + Extracting + Flashing the 4.1.1 factory image from Google
- Follow the on-screen instructions to first download the image then the toolkit will extract and flash it on your phone

NOTE :
- Make sure the ADB and Bootloader drivers are installed on your computer
- The complete process needs to be done in fastboot mode so make sure your "daaba"(GNex :p ) is charged over 80%
- The 4.1.1 image is 233MB so its gonna take approx 25mins on a 1Mbps connection to download so be patient
- Install the drivers for your phone first and then enter fastboot,best way to check if the drivers are installed properly or not is to check Device Manger(Look for Android Phone,it will show you the GNex,if drivers are installed properly)

If you still have any hesistation,I have PM'd you my number ;)
 
  • Like
Reactions: 2 people
Thanks YashBhatt. I already have experience on my Defy so I am not that scared. :P

I've already used ADB with my Defy. That means ADB drivers are installed right? And how do I install the bootloader drivers?

"Galaxy Nexus" shows up under "Portable Devices" and I'm able to transfer files to my phone. Will it be detected properly during bootloader mode?

EDIT : Looks like the toolkit will automatically install the required drivers.

Wokay mattey !!
Just keep me updated on the progress,Happy flashing :)

NOTE : Upgrade from ICS to JB using the toolkit might remove the root on your GNex,so you might have to root your GNex again
 
seraph Thanks for the suggestions. I'm looking at one of the Gadgetshieldz one on eBay : Ultra-Thin Skins for Samsung Galaxy Nexus | eBay. The installation seems to be really hard. :O How did it go for you?

Installation seems difficult. It was a first time for me too but I took it as a challenge. I have no idea though what's the difference between a dry Screen Guard like Yash mentioned and the wet one that I applied. As of now, the screen protector has properly settled down. These guys provided protectors for every possible surface, ie, including the sides also. As of now I have only applied it for the screen and the back (they have provided separate films for the battery back and the body beneath that). I am very satisfied with the results.
 
- First of all,welcome to the GNex club buddy !!
- Rooting doesn't delete your data its the bootloader unlocking that will wipe your data out,best way to backup your apps will be to use "Titanium Backup" from the Play Store
- One of the best ways to root your device and unlocking the bootloader is mentioned in this thread,you just have to press some numbers on the keypad(Follow the Options) and the GNex Toolkit will do everything for you
- Rooting and Unlocking the Bootloader are completely different things,but in this case YES,its a subsequent step (First Unlock and then Root)
- In simple terms,a kernel is something that helps your hardware go hand - in - hand with your software and applications,flashing a kernel other than the stock will improve the performance of your device as there are various kernel's out there for our GNex that improves that hand - in -hand co-ordination between the hardware and software
- A kernel can be flashed at any point of time on a ROM,there is no fixed procedure or any subsequent steps for flashing it(You need ClockWork Mod Recovery for flashing any files on the GNex which is installed during the whole Rooting/Unlocking procedure)
- Rooting is just giving your phone "SuperUser" rights to acess the core files on the Android System/OS just like in Linux so Kernel flashing and rooting are completely different things

Hope,this helps mate...Anymore queries feel free to ask out !!

Ok what I have gathered from today's research work on custom ROMs and Rooting and Unlocking, my data will be wiped clean upon unlocking right?
Now how do I take a backup of that? Titanium only works on rooted device and my device is unrooted as of now ofcourse.
As of now, I am downloading the Gnex toolkit by mskip.
[GNex TOOLKIT V7.8] Drivers, Backup, Unlock, Root, CWM, Flash, Mods + MUCH MORE [GSM] - xda-developers

It installs the adb automatically. After installing that, does it automatically perform and store a backup too?
Also which build number to go for? Mine is the same as @kvikram IMM76K.

If "NOTE : Upgrade from ICS to JB using the toolkit might remove the root on your GNex,so you might have to root your GNex again" then what to keep in mind?
 
Last edited by a moderator:
Ok what I have gathered from today's research work on custom ROMs and Rooting and Unlocking, my data will be wiped clean upon unlocking right?
Now how do I take a backup of that? Titanium only works on rooted device and my device is unrooted as of now ofcourse.
As of now, I am downloading the Gnex toolkit by mskip.
[GNex TOOLKIT V7.8] Drivers, Backup, Unlock, Root, CWM, Flash, Mods + MUCH MORE [GSM] - xda-developers

It installs the adb automatically. After installing that, does it automatically perform and store a backup too?
Also which build number to go for? Mine is the same as @kvikram IMM76K.

If "NOTE : Upgrade from ICS to JB using the toolkit might remove the root on your GNex,so you might have to root your GNex again" then what to keep in mind?

Select the IMM76I model and then upgrade as mentioned above
If you loose your root,then root it again using the toolkit :p

What do you want to backup ?? SMS ?? if so then use "SMS Backup/restore" from market and save the .xml files from the phone into your PC as a backup
Also manually copy your music and photo's on your PC as the upgrade from ICS to JB will wipe your phone memory ;)
 
Last edited by a moderator:
Want the entire backup - apps, music, pictures,contacts everything so that once I have performed the above operations I can get all the data as before.
 
Want the entire backup - apps, music, pictures,contacts everything so that once I have performed the above operations I can get all the data as before.

Do a Nandroid backup if you have CWM installed, if not then first root your phone then back it up....
Or manually copy - paste music, photos on PC and sync contacts on Google, get the apps reinstalled once you have upgraded....
 
I get the "daemon not running error : cannot connect to daemon" frequently when launching the toolkit. In spite of this I went ahead with option 8. The bootloader was successfully unlocked but the remaining processes got interrupted due to this error. I'll try reinstalling the ADB drivers, because it clearly seems to be a problem with ADB that pops up frequently, but doesn't seem to follow any specific pattern or indicate any cause for such an error.
 
I get the "daemon not running error : cannot connect to daemon" frequently when launching the toolkit. In spite of this I went ahead with option 8. The bootloader was successfully unlocked but the remaining processes got interrupted due to this error. I'll try reinstalling the ADB drivers, because it clearly seems to be a problem with ADB that pops up frequently, but doesn't seem to follow any specific pattern or indicate any cause for such an error.

Drivers :sleep:
Make sure the ADB and Bootloader drivers are properly installed !!
 
It seems Droid Explorer is the source of the problem. Uninstalling Droid Explorer fixed it. :D

Looks like the adb.exe used by Droid Explorer was interfering with the driver.

- - - Updated - - -

Successfully rooted! Now downloading Jelly Bean factory image! :yahoo:
 
It seems Droid Explorer is the source of the problem. Uninstalling Droid Explorer fixed it. :D

Looks like the adb.exe used by Droid Explorer was interfering with the driver.

Wonderful...
btw,why do you use Droid Explorer ?? Try ES File Explorer,i find it pretty simple with all the necessary features ;)
 
Wonderful...
btw,why do you use Droid Explorer ?? Try ES File Explorer,i find it pretty simple with all the necessary features ;)
Droid explorer is a Windows program to access the android /root folder from the computer. I was using it with my Defy. :P
 
Droid explorer is a Windows program to access the android /root folder from the computer. I was using it with my Defy. :P

Yea,I understand that but when you can access the root directory from the phone itself why bother using a windows program ;)
 
Status
Not open for further replies.