arunmcops
Discoverer
Hi,
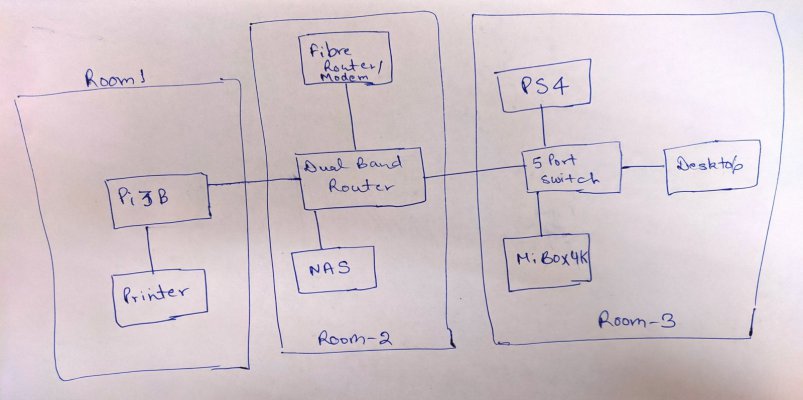
I was having a network/PC setup as for attached diagram.
 I have HP Ink tank 310 Printer which was in other roomand printer does not have any Ethernet port,only a USB port. I was unable to use printer on my network as it only came with USB. I was having a spare Raspberry Pi 3B. This guide is based on using it to convertUSB printer to network printer and using it with all network devices for printing.

Print Server can connect multiple computers to a single or multiple printers wired or wirelessly. With the help of the Print server, you can access your printer with multiple devices and can send the print command from any of the connected devices to the printer to print any document.
For this Raspberry Pi Print Server tutorial, we will be creating a Network Printer with the aid of the Raspberry Pi 3 and the almighty CUPS which makes it all possible.
CUPS (Common Unix Printing System) is a printing system for UNIX like operating systems based computers. It gives computers on which it is running the ability to act as a print server. A computer running CUPS is able to accept jobs from client devices, process them and pass it on to the appropriate printer to print.

All most all printers are supported by CUPS especially HP printers since HP operates its own open source project. Other printer models that are not directly supported by CUPS may have generic drivers that are compatible which provides basic printing functions.
For this tutorial, we will need the following components, some of which you may certainly have laying around and won’t need to buy.
This section will carry us through a series of steps that will culminate in the installation of CUPS on your Raspberry Pi.
Step 1: Upgrade the Pi
Kind of a ritual, first thing for all of my projects is updating the Raspberry Pi, by doing this you ensure your pi has all the latest updates to the OS you are working with.
To do this we use;
sudo apt-get update
sudo apt-get upgrade
With this done, reboot the pi using;
sudo reboot
Wait for the reboot process and login again
Step 2: Install Print Server Software CUPS
With the update done the next line of action is to install our print server software CUPS.
To do this run;
sudo apt-get install cups
This will take some time but will install CUPS and other dependencies like Samba, perl and several other software or libraries.
Step 3: Configure CUPS
With Installation done, its time to check out the configuration file of CUPS. Several settings that generally affect how cups works, like the port on which cups communicate which is by default 631, port can be changed here.
The config file can be accessed using;
sudo nano /etc/cups/cupsd.conf
Change/add the following lines to the configuration file.
# Only listen for connections from the local machine.
#Listen localhost:631
#CHANGED TO LISTEN TO LOCAL LAN
Port 631
# Restrict access to the server...
<Location />
Order allow,deny
Allow @Local
</Location>
# Restrict access to the admin pages...
<Location /admin>
Order allow,deny
Allow @Local
</Location>
# Restrict access to configuration files...
<Location /admin/conf>
AuthType Default
Require user @system
Order allow,deny
Allow @Local
</Location>
Save the file using ctrl+X followed by y and then enter.
After saving, restart CUPS to effect the changes to the configuration file using;
sudo service cups restart
Step 4: User Access Settings
Next we add the Pi user to the Ipadmin group. This gives the Raspberry Pi the ability to perform administrative functions of CUPS without necessarily being a super user.
sudo usermod -a -G Ipadmin pi
Step 5: Network Accessibility
Next we need to ensure that CUPS can be connected to on the home network and its also accessible across the entire network.
To get it to allow all connections on the network, run;
sudo cupsctl –remote-any
After this we then restart cups to effect changes using;
sudo /etc/init.d/cups restart
With this done we can proceed to test if it works effectively by checking out the CUPS homepage.
Open a web browser and type in your Pi’s IP address, indicating the cups port.
e.g 192.168.137.147:631
631 is the cups port.
You should see the cups homepage like the image below.

Now on the home page, click on the administration tab.
This will take you to the administration page where you will see add new printer. Follow the prompts, select your printer server and continue.

On the final stage before clicking on continue, ensure you checked the “share this printer” check box.
With this you are all done, move the printer to the preferred location, fire up your Raspberry Pi and print away.
Oh before I forget (rushing to get some chicken, it’s Christmas), to add the new created network printer on your Windows PC, go to devices and printers, select “Add a printer”


I was having a network/PC setup as for attached diagram.
Print Server can connect multiple computers to a single or multiple printers wired or wirelessly. With the help of the Print server, you can access your printer with multiple devices and can send the print command from any of the connected devices to the printer to print any document.
For this Raspberry Pi Print Server tutorial, we will be creating a Network Printer with the aid of the Raspberry Pi 3 and the almighty CUPS which makes it all possible.
CUPS (Common Unix Printing System) is a printing system for UNIX like operating systems based computers. It gives computers on which it is running the ability to act as a print server. A computer running CUPS is able to accept jobs from client devices, process them and pass it on to the appropriate printer to print.
All most all printers are supported by CUPS especially HP printers since HP operates its own open source project. Other printer models that are not directly supported by CUPS may have generic drivers that are compatible which provides basic printing functions.
Required Components
For this tutorial, we will need the following components, some of which you may certainly have laying around and won’t need to buy.
- Raspberry Pi 3
- SD Card (8gb at least)
- USB printer
- Ethernet Cable
- Power Supply for the Pi
Setting up Network Printer on Raspberry Pi:
This section will carry us through a series of steps that will culminate in the installation of CUPS on your Raspberry Pi.
Step 1: Upgrade the Pi
Kind of a ritual, first thing for all of my projects is updating the Raspberry Pi, by doing this you ensure your pi has all the latest updates to the OS you are working with.
To do this we use;
sudo apt-get update
sudo apt-get upgrade
With this done, reboot the pi using;
sudo reboot
Wait for the reboot process and login again
Step 2: Install Print Server Software CUPS
With the update done the next line of action is to install our print server software CUPS.
To do this run;
sudo apt-get install cups
This will take some time but will install CUPS and other dependencies like Samba, perl and several other software or libraries.
Step 3: Configure CUPS
With Installation done, its time to check out the configuration file of CUPS. Several settings that generally affect how cups works, like the port on which cups communicate which is by default 631, port can be changed here.
The config file can be accessed using;
sudo nano /etc/cups/cupsd.conf
Change/add the following lines to the configuration file.
# Only listen for connections from the local machine.
#Listen localhost:631
#CHANGED TO LISTEN TO LOCAL LAN
Port 631
# Restrict access to the server...
<Location />
Order allow,deny
Allow @Local
</Location>
# Restrict access to the admin pages...
<Location /admin>
Order allow,deny
Allow @Local
</Location>
# Restrict access to configuration files...
<Location /admin/conf>
AuthType Default
Require user @system
Order allow,deny
Allow @Local
</Location>
Save the file using ctrl+X followed by y and then enter.
After saving, restart CUPS to effect the changes to the configuration file using;
sudo service cups restart
Step 4: User Access Settings
Next we add the Pi user to the Ipadmin group. This gives the Raspberry Pi the ability to perform administrative functions of CUPS without necessarily being a super user.
sudo usermod -a -G Ipadmin pi
Step 5: Network Accessibility
Next we need to ensure that CUPS can be connected to on the home network and its also accessible across the entire network.
To get it to allow all connections on the network, run;
sudo cupsctl –remote-any
After this we then restart cups to effect changes using;
sudo /etc/init.d/cups restart
With this done we can proceed to test if it works effectively by checking out the CUPS homepage.
Open a web browser and type in your Pi’s IP address, indicating the cups port.
e.g 192.168.137.147:631
631 is the cups port.
You should see the cups homepage like the image below.
Now on the home page, click on the administration tab.
This will take you to the administration page where you will see add new printer. Follow the prompts, select your printer server and continue.
On the final stage before clicking on continue, ensure you checked the “share this printer” check box.
With this you are all done, move the printer to the preferred location, fire up your Raspberry Pi and print away.
Oh before I forget (rushing to get some chicken, it’s Christmas), to add the new created network printer on your Windows PC, go to devices and printers, select “Add a printer”