
Just checked that B1 now has dd-wrt support time to get rid of filthy Asus Software
Router Database | www.dd-wrt.com
Source - Asus RT-N13U - DD-WRT Wiki
So its finally here –
Most of the contents have been taken from DD-WRT Wiki and added/modified some info to improve the information flow.
Guide to Install DD-WRT on Asus RT-N13U
Reasons why you should opt for DD-WRT over shitty Asus Firmware
You should not do this if you dont understand much of it.[SERIOUSLY]
Flashing Process
First and foremost you must take care that you have Asus Original Firmware with you just in case anything goes wrong while flashing[Dont hold me responsible]
Flash to DD-WRT
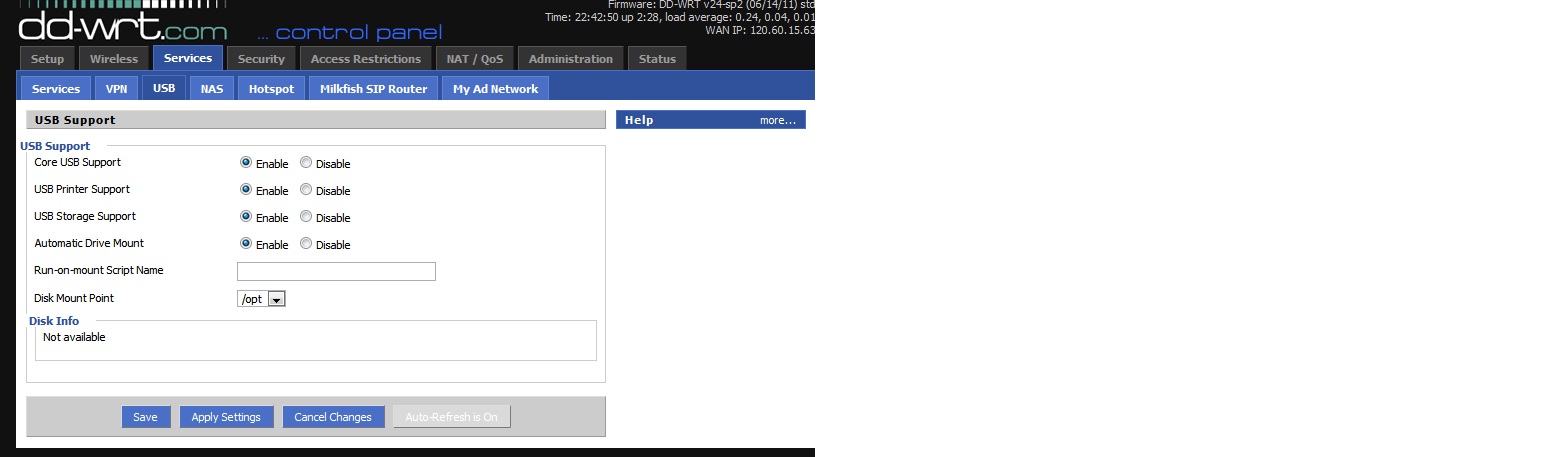
Configure USB
Once this is done CFW [DD-WRT] is installed on your router now you need to get other utilities installed.
Firstly need to configure a USB where we would be installing the apps
The software we will install needs to be saved on the usb disk and, while we could actually save it on the same partition we will use for the data, it is highly discouraged.
DD-WRT support Ext2, Ext3,FAT32,FAT,NTFS but i have gone with EXT3 since its gives best performance NTFS seriously hampers down the downloads if you do it via Transmission if you are not using router for downloads you can use NTFS as well
For this we will create 2 different partition Ii have Ext3 – 512MB [Acting like a C:] and a 12GB Ext3 partition acting as D: to store the data.
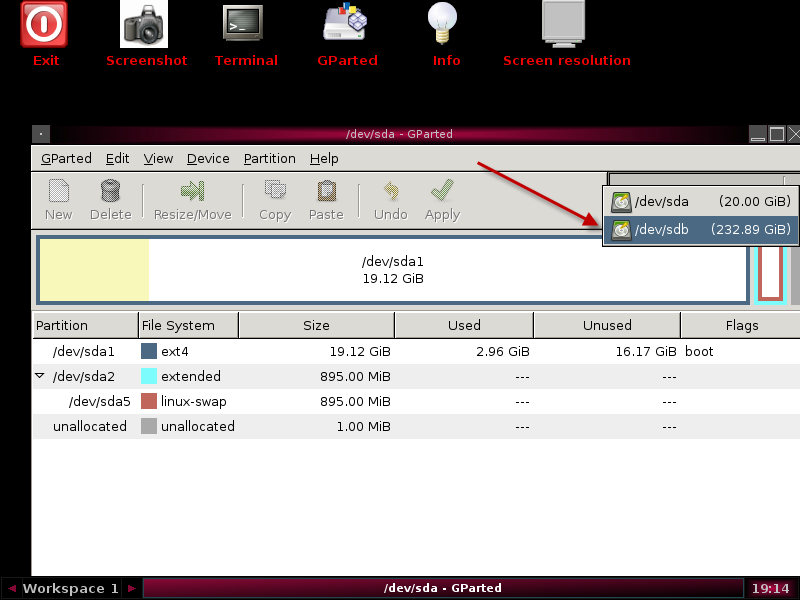
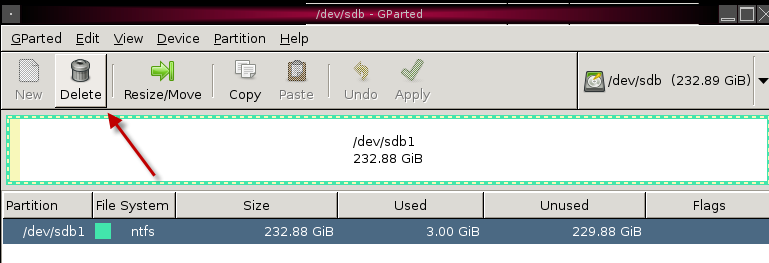
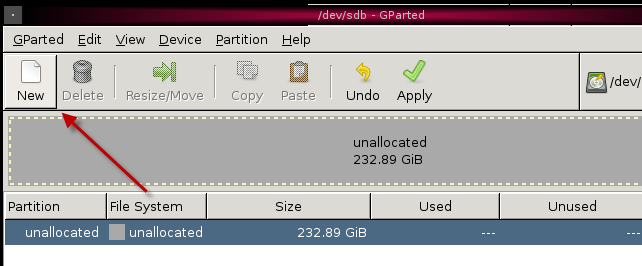
How to create partition on USB – Get Gparted from here GParted -- Download
There are also tools like Easeus Partition manager and Minti Tool Partion Manager
Burn it as iso and boot pc from CD
Follow the steps shown in the pics to see the procedure
Make sure you select proper drive and NOT Accidentaly your hard drive

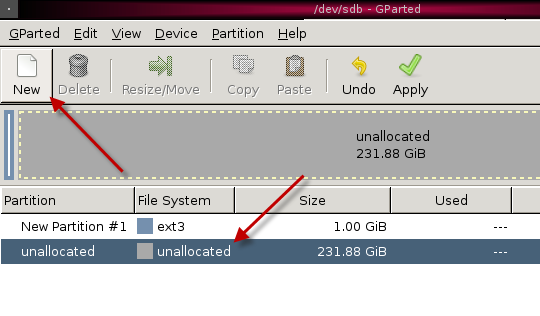
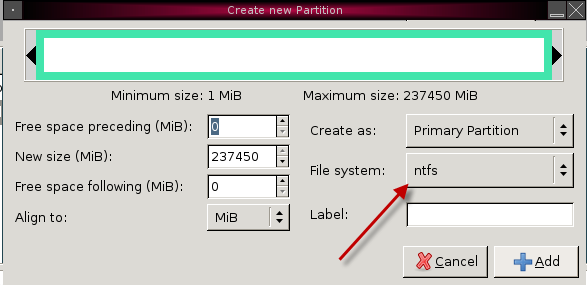

Above steps are shown for Ext3 and NTFS but you can always create 2 different EXT3 Partition.
Once done re-start pc by clicking Exit option.
Read comments beside the line to understand what it does
If the drive was successfully mounted (which may take some time), try another filesystems by editing 1st line of script.
[NOTE: check mounts thru putty by df -h because in dd-wrt gui is is shown only after repluging drive]
You might see something like this.
If you dont see /opt as mounted default go to Services->USB and change the mount to /opt Save and Apply Settings and then re-boot the router again Admin->Management go bottom Re-boot router
Installing Optware
Now we will be installing Optware which helps installing every other apps.
Before that get Putty
Telnet to 192.168.1.1 with root username and password which you had set and run mount command to see whether the drives have mounted correctly or not your drives have to be mounted correctlty to get move ahead

Host Name: 192.168.1.1
Connection type: Telnet
Installing Optware (only to an ext3 partition; /opt MUST be empty)
[NOTE: gateway is hard set to 192.168.1.1, if u have problem with this replace in optware-install.sh by vi or sed]
Now you can install another Optware packabe from Tutorials - DD-WRT Wiki or if u like:
Recommend change to ipkg to track the download status while install pkg unhash the verbose-wget line
Install xinetd, vsftpd, samba, webserver, pxe boot server, wget, nano, htop, dlq rapget
[I havent installed nano since i dont needed it vi does the job for me ;-) and dont install samba 3.5 samba 2 provide best transfer speeds]
samba: \\192.168.1.1
rem to add as hardrive in W7/XP run in command line
net use a: \\192.168.1.1\www
net use b: \\192.168.1.1\dlq
web: http://192.168.1.1:8080
ftp: ftp://192.168.1.1
Router Database | www.dd-wrt.com
Source - Asus RT-N13U - DD-WRT Wiki
So its finally here –
Most of the contents have been taken from DD-WRT Wiki and added/modified some info to improve the information flow.
Guide to Install DD-WRT on Asus RT-N13U
Reasons why you should opt for DD-WRT over shitty Asus Firmware
- Almost all Linux Kernel Fixes done in dd-wrt.
- Allows freedom to go about install any apps which linux supports(Most probably all of them)
- Very good for people who intend to use in cybercafes as it allows tighter control and improved security and proper logging of events
- DD-WRT is far superior compared to other open Firmware like Tomato and Open WRT and DD-WRT community is best in the recent times.
- Install Transmission to get all download on your USB without keeping the PC turned on[Yes it supports full resume downloads never break now]
You should not do this if you dont understand much of it.[SERIOUSLY]
Flashing Process
First and foremost you must take care that you have Asus Original Firmware with you just in case anything goes wrong while flashing[Dont hold me responsible]
- Download latest DD-WRT Firmware Image[This is the custom firmware]
Browse to firmware repository and select/open most current directory, Ex. 12-24-10-r15962/
Open 'Asus-RTN13U' directory and download 'asus-to-ddwrt.trx'[Choose the router model appropriately if its B1 then select from 'Asus-RTN13UB1' ]
Recommended is to get 16804. - Download latest version of the Asus Utility[This is just in case of rolling back]
Browse to ASUSTeK Computer Inc. -Support- Drivers and Download
In the three dropdown menus, select 'Wireless', 'AP/Router', 'RT-N13U', and click 'Search'
Select OS in popup menu
Click '+' next to 'Utilities' and skip down to your version (Also see next step, download firmware.)
Within that zip file, navigate to the UT4063/Utility folder and run 'setup' to install.
Be sure there is access to the Firmware Restoration utility - Download safety copy of Asus firmware
Do same as previous step, except click '+' next to 'Firmware' and download latest version of your model
Note that this file should not be needed; use only to restore Asus FW to router if later desired. - Last few checks
If not already directly wired, connect Ethernet cable from one of the router's LAN ports to client PC.
Be sure router's other three LAN ports and WAN port are open (nothing connected)[Very Very Important]
On PC, disable all other network adapters: wireless, modem, etc.[Another very important step ignoring it might brick the router]
On PC, disable any firewall (Ex. Windows Firewall)
Optional: Set PC to use a static IP, Ex. 192.168.1.2, netmask 255.255.255.0, gateway 192.168.1.1[I recommend this to be done]
If possible, use uninterruptable power supply (UPS) for both PC and router. A power failure while flashing, though not likely, will probably brick the router.
Note: Early on, some had problems using Firefox. Consider using Internet Explorer or Chrome.
Flash to DD-WRT
- Place router in Recovery mode
Disconnect power adapter plug from the RT-N13U
Push and hold the Restore button located on bottom panel[use a pen point to press the button properly]. While continuing to hold down the Restore button, plug the power adapter back into router.
After five seconds, LED on front panel starts to blink, release the button. - Upload firmware image
On PC, open Asus' Firmware Restoration utility (installed earlier)
In Firmware Restoration window, click 'Browse' and select the DD-WRT image file, asus-to-ddwrt.trx (downloaded earlier)
Click 'Upload' to begin flash process that can take up to four minutes. Brick warning: Do not interrupt!
When message that router is rebooting appears, close Firmware Restoration utility. - Reboot, launch DD-WRT web interface, and cleanup
After a minute or two, disconnect power adapter plug from the RT-N13U
Wait at least ten seconds, then reconnect to power
If optional step of setting static IP was followed earlier, can reset to automatic
Browse to 192.168.1.1 should bring up the DD-WRT web interface; set name/password for first access
Configure router as desired. Default connection is DHCP; for DSL check DSL with DD-WRT.
When satisfied that factory firmware will not be used again, uninstall Asus Utility from PC and delete Asus files.[I wont recommend removing this]
Configure USB
Once this is done CFW [DD-WRT] is installed on your router now you need to get other utilities installed.
Firstly need to configure a USB where we would be installing the apps
The software we will install needs to be saved on the usb disk and, while we could actually save it on the same partition we will use for the data, it is highly discouraged.
DD-WRT support Ext2, Ext3,FAT32,FAT,NTFS but i have gone with EXT3 since its gives best performance NTFS seriously hampers down the downloads if you do it via Transmission if you are not using router for downloads you can use NTFS as well
For this we will create 2 different partition Ii have Ext3 – 512MB [Acting like a C:] and a 12GB Ext3 partition acting as D: to store the data.
How to create partition on USB – Get Gparted from here GParted -- Download
There are also tools like Easeus Partition manager and Minti Tool Partion Manager
Burn it as iso and boot pc from CD
Follow the steps shown in the pics to see the procedure
Make sure you select proper drive and NOT Accidentaly your hard drive
Above steps are shown for Ext3 and NTFS but you can always create 2 different EXT3 Partition.
Once done re-start pc by clicking Exit option.
Partition 1 – Mounted on /opt – From 512Mb to 2Gb (I normally use 1Gb) – Formatted with EXT3
Partition 2 – Mounted on /mnt – All the remaining space – Formatted with EXT3
- Just paste the following into the text box in Administration -> Commands and click Save Startup
[NOTE: configuration of filesystem support and partitions can be easy set at first line, NTFS needs aditional driver, that can be installed after you pass Optware guide by ipkg install ntfs-3g]
Read comments beside the line to understand what it does
Code:
mkdir /tmp/etc/config #Create a dir /tmp/etc/config
echo "wget http://home.karneval.cz/10102207/fs.gz -P /tmp/root" >> /tmp/etc/config/fs.wanup #Get the tar file which has fs drivers and store in /tmp/root
echo "tar -xvzf /tmp/root/fs.gz -C /tmp/root" >> /tmp/etc/config/fs.wanup #Build a shell script by appending to output using >> , command to extract the tar file.
echo "sh /tmp/root/ext3" >> /tmp/etc/config/fs.wanup #Add ext3 to run it
echo "mount -o rw -t ext3 /dev/discs/disc0/part1 /opt" >> /tmp/etc/config/fs.wanup #Add mount to 1st partition
echo "mount -o rw -t ext3 /dev/discs/disc0/part2 /mnt" >> /tmp/etc/config/fs.wanup #Add mount to 2nd partition
echo "rm /tmp/root/*.ko /tmp/root/fs.gz /tmp/root/ext3" >> /tmp/etc/config/fs.wanup #Clean up the traces
chmod +x /tmp/etc/config/fs.wanup # Provide Exec permissions and run the above commands
echo "nobody:*:65000:65000:nobody:/mnt:/bin/false" >> /etc/passwd # Add nobody for samba share
sleep 60 # Wait for 1 minute

echo 1 > /sys/class/scsi_disk/0:0:0:0/allow_restart # To avoid HDD spindown

wget [URL]http://www.3iii.dk/linux/optware/settings.json[/URL] -O /mnt/data/torrents/.config/transmission-daemon/settings.json # Get the settings.json from internet just in case local file gets corrupted can you remove this if u dont want

/opt/bin/transmission-daemon -g /mnt/data/torrents/.config/transmission-daemon #Start Transmission - Can remove this if you keep S99trans file keep either of them.- Enable the following under Services -> USB
- Core USB Support
- USB 2.0 Support
- USB Storage Support
- Automatic Drive Mount
- Reboot router with an ext3 formatted USB drive plugged in
If the drive was successfully mounted (which may take some time), try another filesystems by editing 1st line of script.
[NOTE: check mounts thru putty by df -h because in dd-wrt gui is is shown only after repluging drive]
You might see something like this.
If you dont see /opt as mounted default go to Services->USB and change the mount to /opt Save and Apply Settings and then re-boot the router again Admin->Management go bottom Re-boot router
Installing Optware
Now we will be installing Optware which helps installing every other apps.
Before that get Putty
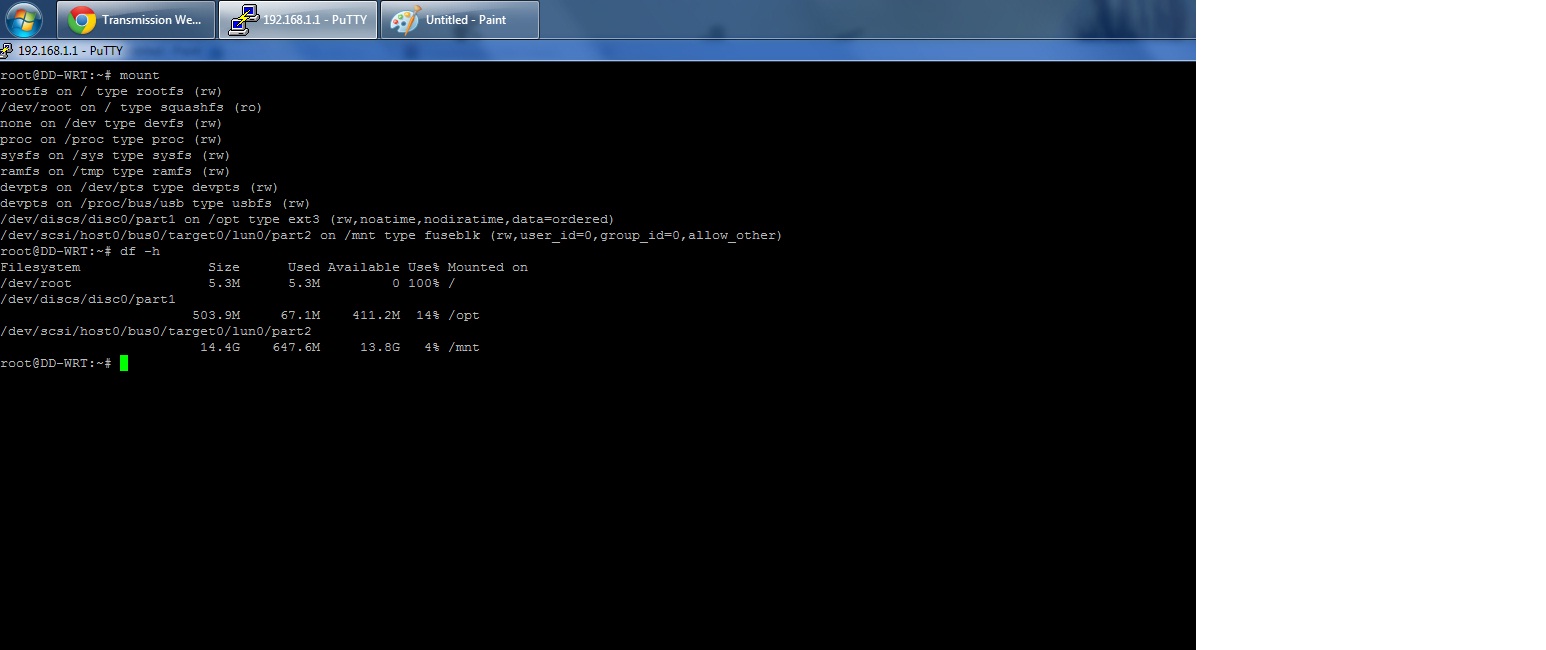
Telnet to 192.168.1.1 with root username and password which you had set and run mount command to see whether the drives have mounted correctly or not your drives have to be mounted correctlty to get move ahead
Code:
root@DD-WRT:/tmp# mount

rootfs on / type rootfs (rw)

/dev/root on / type squashfs (ro)

none on /dev type devfs (rw)

proc on /proc type proc (rw)

sysfs on /sys type sysfs (rw)

ramfs on /tmp type ramfs (rw)

devpts on /dev/pts type devpts (rw)

devpts on /proc/bus/usb type usbfs (rw)

/dev/discs/disc0/part1 on /opt type ext3 (rw,noatime,nodiratime,data=ordered)

/dev/discs/disc0/part2 on /mnt type ext3 (rw,noatime,nodiratime,data=ordered)

root@DD-WRT:/tmp#
Host Name: 192.168.1.1
Connection type: Telnet
Installing Optware (only to an ext3 partition; /opt MUST be empty)
Code:
wget [URL]http://home.karneval.cz/10102207/optware-install.sh[/URL] -O - | tr -d '\r' > /tmp/optware-install.sh

sh /tmp/optware-install.sh; ipkg update; ipkg upgrade

wget [URL]http://home.karneval.cz/10102207/sort[/URL] -P /opt/bin; chmod +x /opt/bin/sort
[NOTE: gateway is hard set to 192.168.1.1, if u have problem with this replace in optware-install.sh by vi or sed]
Now you can install another Optware packabe from Tutorials - DD-WRT Wiki or if u like:
Recommend change to ipkg to track the download status while install pkg unhash the verbose-wget line
Code:
root@DD-WRT:/opt/etc# more ipkg.conf

#Uncomment the following line for native packages feed (if any)

#src/gz native [URL]http://ipkg.nslu2-linux.org/feeds/optware/ddwrt/native/stable[/URL]

src/gz optware [URL]http://ipkg.nslu2-linux.org/feeds/optware/ddwrt/cross/stable[/URL]

dest /opt/ /

option verbose-wget               ##################This line will have a # prefix to it , remove it
Install xinetd, vsftpd, samba, webserver, pxe boot server, wget, nano, htop, dlq rapget
[I havent installed nano since i dont needed it vi does the job for me ;-) and dont install samba 3.5 samba 2 provide best transfer speeds]
Code:
ipkg install xinetd htop nano samba2 vsftpd tftp-hpa wget; killall xinetd smbd nmbd

rm /opt/etc/samba/smb.conf /opt/etc/vsftpd.conf /opt/etc/init.d/S80samba  /opt/etc/xinetd.d/tftp

wget [URL]http://home.karneval.cz/10102207/opt.gz[/URL] -P /opt; tar -xvzf /opt/opt.gz -C /opt

sh /opt/etc/init.d/S10httpd; sh /opt/etc/init.d/S10xinetd; rm /opt/opt.gz- Well done, RT-N13u is ready for basic usage, u can acces by
samba: \\192.168.1.1
rem to add as hardrive in W7/XP run in command line
net use a: \\192.168.1.1\www
net use b: \\192.168.1.1\dlq
web: http://192.168.1.1:8080
ftp: ftp://192.168.1.1
- Open to the world (paste to Administrations -> Commands and Save Firewall)
Code:iptables -t nat -I PREROUTING -p tcp -d $(nvram get wan_ipaddr) --dport 80 -j DNAT --to 192.168.1.1:8080 iptables -t nat -I PREROUTING -p tcp -d $(nvram get wan_ipaddr) --dport 22 -j DNAT --to 192.168.1.1:22 iptables -t nat -I PREROUTING -p tcp -d $(nvram get wan_ipaddr) --dport 21 -j DNAT --to 192.168.1.1:21 iptables -I INPUT -p tcp -d 192.168.1.1 --dport 8080 -j logaccept iptables -I INPUT -p tcp -d 192.168.1.1 --dport 22 -j logaccept iptables -I INPUT -p tcp -d 192.168.1.1 --dport 21 -j logaccept
Now the reason why i bought this router
Installing a Transmission-daemon
Make the following folders
Code:cd /mnt mkdir -p /mnt/data/torrents # -p to make both directories at the same time
The plan is to have everything torrent go to the folder /mnt/data/torrents.So torrent data would be under Partition 2
Installing Transmission
Code:/opt/bin/ipkg-opt -verbose_wget install transmission
Started and stopped Transmission to get the basic work folders
Code:/opt/bin/transmission-daemon -g /mnt/data/torrents/.config/transmission-daemon killall transmission-daemon
With the command above you get the basic folder structure of:
Code:/mnt/data/torrents/.config/ /mnt/data/torrents/.config/transmission-daemon /mnt/data/torrents/.config/transmission-daemon/settings.json #file /mnt/data/torrents/.config/transmission-daemon/stats.json #file /mnt/data/torrents/.config/transmission-daemon/blocklists /mnt/data/torrents/.config/transmission-daemon/resume /mnt/data/torrents/.config/transmission-daemon/torrents
Edit settings.json to contain the following
Code:vi /mnt/data/torrents/.config/transmission-daemon/settings.json { "blocklist-enabled": 1, "download-dir": "/mnt/data/torrents", "download-limit": 100, "download-limit-enabled": 1, "dht-enabled": false, "encryption": 2, "lpd-enabled": false, "max-peers-global": 35, "peer-port": 25000, "pex-enabled": 1, "port-forwarding-enabled": 1, "rpc-authentication-required": 0, "rpc-password": "", "rpc-port": 9091, "rpc-username": "", "rpc-whitelist": "192.168.1.*", "umask": 0, "upload-limit": 200, "upload-limit-enabled": 1, "utp-enabled": true }
The file settings.json can also be downloaded from here (the wget command is one line):
Code:wget [URL]http://www.3iii.dk/linux/optware/settings.json[/URL] -O /mnt/data/torrents/.config/transmission-daemon/settings.json
Open the port
Code:/usr/sbin/iptables -I INPUT 1 -p tcp --dport 25000 -j logaccept
Run again
Code:/opt/bin/transmission-daemon -g /mnt/data/torrents/.config/transmission-daemon
Accessing Transmission web interface
Now you get web access to the Transmission page by going to http://192.168.1.1:9091. That is, if your routers IP is 192.168.1.1
How to get transmission to download torrent files?
- In a web browser go to your favourite torrent site/tracker and download a "<myfile>.torrent" file
- In a web browser go to 192.168.1.1:9091 to enter the Transmission web page.
- click "open"
- click the text field (or "select" button)
- point out the "<myfile>.torrent"
- click "upload"
and the torrent'ed file should start downloading shortly.
The downloaded file will turn up in the /mnt/data/torrents folder.
The full space of the file will be reserved from the start, so in a FTP, WinSCP or Explorer via Samba it may seem like the file is all there immediately, but it is not! It is fully downloaded when the line turns green in the Transmission web interface at 192.168.1.1:9091.
You can see details about any of the torrent files by clicking the Inspector button on the right in the Transmission web interface.
I personally prefer Transmission Remote GUI, nice uTorrent kind of interface just enter IP as 192.168.1.1 and port as 9091[Or whatever you have confired]
http://code.google.c...son-remote-gui/
Wanna Share the Data of the Mounted Drive via Wi-Fi run the below command
Code:ln -s /mnt/data /opt/share/www/data
Change the smb.conf file to /mnt/data
Or just simply change the samba file.
Code:root@DD-WRT:/opt/etc/samba# vi smb.conf [global] server string = dd-wrt workgroup = dd-wrt netbios name = dd-wrt interfaces = 192.168.1.1/255.255.255.0 security = share encrypt passwords = yes smb passwd file = /opt/etc/samba/smbpasswd null passwords = Yes client code page = 850 character set = ISO8859-1 socket options = TCP_NODELAY SO_RCVBUF=8192 SO_SNDBUF=8192 log file = /opt/var/samba/log.* max log size = 100 load printers = No dns proxy = No hosts allow = 192.168. 127. remote announce = 192.168.1.255 [www] [B]path = /mnt/data[/B] #######This is where you change read only = no guest ok = yes [dlq] path = /opt/share/dlq read only = no guest ok = yes
Having problems mounting the drive
Read the guide again , you have definitely missed something, most people do the incorrect partitioning causing all the trouble and do not add the startup script.
If still not provide the output of following commands in the thread
Code:dmesg lsmod cd /dev/discs/disc0;ls -lrt mount
To recognize ext3 partition in Windows get Ext2FSD install and run the service then you can read write on Ext3 partition too on windows.
Ext2Fsd Project
Hard disk spin down issue fix [recommended for Portable HDD]
Code:echo 1 > /sys/class/scsi_disk/0:0:0:0/allow_restart
USB Getting unmounted / readonly with below error in dmesg
<3>scsi 0:0:0:0: rejecting I/O to dead device
Run this
Code:echo 128 > /sys/block/sda/device/max_sectors
Add this to your startup
How many torrents can it handle ?
If you cant get the drive mounted make sure you had the startup script set up correctly and partitions are created in correct order and if you are on ADSL make sure the modem is connected to internet.
Reverting to Asus Firmware
Code:First: download the right firmware from the ASUS website ([URL]http://support.asus.com/download/download.aspx?SLanguage=en-us[/URL]) Second: Setup your computer as you did to flash to DD-WRT (static IP address, disable other networking adapters, and use a wired LAN connection, disable your firewall). Third: Install and open the Asus Firmware Restoration utility in windows. Once this is all ready to go, unplug the router. Wait a few seconds, then hold the restore button on the underside of the router. While holding the restore button plug the router back in and keep holding the button until the power light flashes slowly. It will then be in recovery mode waiting for the utility to upload the firmware. Fourth: With the router in recovery mode, select the downloaded firmware with the Firmware Restoration utility. Then click the button to start the upload. The utility will guide you from there. Once done Reset all of the settings to default and started from scratch.
P.S - I have sold my device so i wont able to help much as if now


 And why FAT32 when you have the power of NTFS :clap:
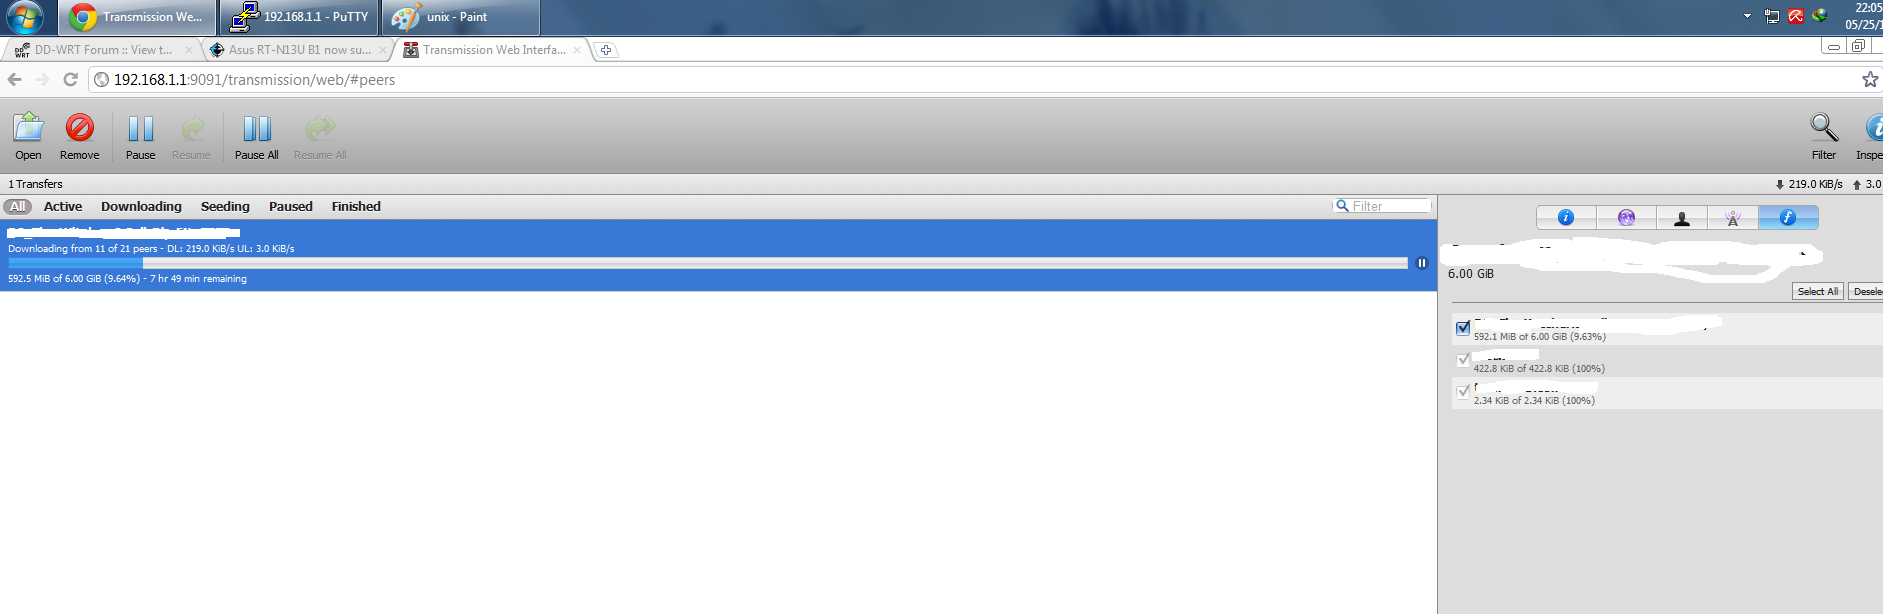
") ... No more selling of B1.
... No more selling of B1.